Kubernetes Templates
Browse our collection of pre-built Kubernetes templates to quickly deploy your applications.
Headless CMS - Strapi-Next.js Kubernetes Template
252 usesSetting up a headless CMS with a decoupled frontend on Kubernetes requires wiring together multiple services, internal routing, and an ingress controller. This template deploys a Strapi backend and a Next.js frontend as separate Kubernetes Deployments, connected via ClusterIP Services and exposed through a single NGINX Ingress with path-based routing. It gives you a working Strapi Next.js Kubernetes setup without writing manifests from scratch.
## What's Included
| Component | Type | Port | Role |
|---|---|---|---|
| Strapi Backend | Deployment + ClusterIP Service | 1337 | Headless CMS / content API |
| Next.js Frontend | Deployment + ClusterIP Service | 3000 | Public blog UI |
| NGINX Ingress | Ingress | 80 | Routes `/admin` to Strapi, `/` to Next.js |
## Architecture Overview
Strapi and Next.js each run as independent Deployments with ClusterIP Services for internal-only access. The NGINX Ingress controller sits at the cluster edge and routes `/admin` traffic to the Strapi service on port 1337 and all other paths to the Next.js service on port 3000. Neither service is directly exposed outside the cluster.
## Prerequisites
- Kubernetes cluster (e.g Docker Desktop or Minikube for local testing)
- NGINX Ingress Controller installed and enabled
- KubeKanvas CLI installed and running on your computer (Optional, if you want to use one-click deployment)
## How to Deploy
1. Click the button at the top right corner of this page to load the manifest into the editor.
2. Update image references in the Strapi and Next.js Deployments to point to your built images.
3. Adjust replica counts if needed.
4. Deploy the template to your cluster via the **Play** button in the top right bar. If you prefer to deploy manually, download the YAML and apply it with kubectl.
5. Wait for all pods to reach Running status. You can monitor progress in the Release Monitor screen.
## How to Test
1. Retrieve the ingress IP. You can check the IP of the ingress in the monitor screen or you can run the kubectl command to get it: `kubectl get ingress -n <namespace>`.
2. Visit `http://<ingress-ip>/admin` and confirm the Strapi admin login screen loads.
3. Visit `http://<ingress-ip>/` and confirm the Next.js frontend renders correctly.
## Use Cases
- **Decoupled CMS and frontend:** Running Strapi as a content API while Next.js handles server-side rendering with SSR/SSG support.
- **Independent service deployments:** Separating backend CMS and frontend so each can be updated and scaled independently.
- **Ingress path routing reference:** Learning path-based ingress routing with a real multi-service application on Docker Desktop or Minikube.
## Summary
This template configures a two-service Strapi and Next.js deployment on Kubernetes with path-based ingress routing and isolated internal services. For a full walkthrough, read [Building a Modern Blog with Strapi and Kubernetes](https://www.kubekanvas.io/blog/building-a-modern-blog-with-strapi-and-kubernetes-your-first-cms-in-the-cloud).
strapikubernetesCMS+1 more
Deploying Your Production Blog - Next.js, Strapi, Database and ConfigMaps
204 usesA production-ready Strapi and Next.js deployment on Kubernetes needs a persistent database, externalized configuration, automated TLS, horizontal autoscaling, and scheduled backups. This template wires all of that together using a PostgreSQL StatefulSet, Kubernetes Secrets and ConfigMaps, a Let's Encrypt ClusterIssuer, a Horizontal Pod Autoscaler, and a daily backup CronJob in a single deployable manifest.
## What's Included
| Component | Type | Port | Role |
|---|---|---|---|
| PostgreSQL | StatefulSet + Headless Service | 5432 | Primary database with 10Gi storage, health probes, and memory limits |
| Media Storage | PersistentVolumeClaim | - | 10Gi volume for Strapi media uploads |
| Backup Storage | PersistentVolumeClaim | - | 20Gi volume for database backup files |
| ConfigMap | ConfigMap | - | Non-sensitive environment configuration for Strapi and Next.js |
| Secrets | Secret | - | Base64-encoded credentials for database and application |
| ClusterIssuer | ClusterIssuer | - | Automated Let's Encrypt TLS certificate provisioning |
| Ingress | Ingress | 443 | HTTPS termination and path-based routing |
| Horizontal Pod Autoscaler | HorizontalPodAutoscaler | - | Scales pods at 70% CPU and 80% memory thresholds |
| Backup CronJob | CronJob | - | Daily PostgreSQL backup at 2 AM with gzip compression and 7-day retention |
## Architecture Overview
PostgreSQL runs as a StatefulSet with a headless Service for stable DNS and dedicated PVCs for data, media, and backups. Strapi reads non-sensitive settings from a ConfigMap and receives credentials via Kubernetes Secrets at pod startup. An NGINX Ingress with Let's Encrypt TLS handles external traffic. The HPA scales Strapi replicas when CPU exceeds 70% or memory exceeds 80%. A CronJob runs daily at 2 AM to produce gzip-compressed PostgreSQL backups with 7-day retention.
## Prerequisites
- Kubernetes cluster (cloud-managed or self-hosted)
- NGINX Ingress Controller installed
- cert-manager installed and configured for Let's Encrypt
- A domain name pointed at your cluster's ingress IP
- KubeKanvas CLI installed and running on your computer (Optional, if you want to use one-click deployment)
## How to Deploy
1. Click on the button at the top right corner of this page to load the manifest into the editor.
2. Update the Secret component with your PostgreSQL credentials and Strapi application secrets.
3. Edit the ConfigMap with your environment-specific Strapi and Next.js configuration values.
4. Set your email address in the ClusterIssuer for Let's Encrypt certificate registration.
5. Deploy the template to your cluster via the **Play** button in the top right bar. If you prefer to deploy manually, download the YAML and apply it with kubectl.
6. Wait for all pods to reach Running status. You can monitor progress in the Release Monitor screen.
## How to Test
1. Verify PostgreSQL is running and all PVCs are bound, check release monitor screen or run command: `kubectl get pods,pvc -n <namespace>`.
2. Open `https://<your-domain>/admin` and confirm the Strapi admin panel loads over HTTPS.
3. Check the HPA is active and reporting metrics.
4. Confirm the backup CronJob is registered.
## Use Cases
- **Graduated production deployment:** Moving a Strapi and Next.js blog from a dev cluster to production with a persistent database, TLS, and autoscaling.
- **Variable-traffic content sites:** Deployments that need replica counts to increase automatically based on CPU and memory usage.
- **Credential-isolated configuration:** Projects that require all sensitive values stored in Kubernetes Secrets rather than embedded in manifests or images.
- **Scheduled backup setups:** Workloads that need daily automated database backups with retention rotation without external tooling.
## Summary
This template configures the full production stack for a Strapi and Next.js blog on Kubernetes, from a PostgreSQL StatefulSet with automated backups to HTTPS and horizontal autoscaling. For a full walkthrough, read [Building and Deploying a Modern Blog Platform with Next.js, Strapi, and Kubernetes: Part 3](https://www.kubekanvas.io/blog/building-and-deploying-a-modern-blog-platform-with-next-js-strapi-and-kubernetes-part-3-production-database-and-security).
strapipostgresqlhorizontalpodscaling
High-Availability WordPress Template for Deployment on Kubernetes
139 usesRunning WordPress on Kubernetes with high availability requires multiple application replicas, a stable MySQL backend, session affinity, automated TLS, horizontal autoscaling, and scheduled backups. This template deploys WordPress as a 3-replica Deployment backed by a MySQL StatefulSet, with cert-manager TLS, a Horizontal Pod Autoscaler, and CronJob-based backups all preconfigured in a single manifest.
## What's Included
| Component | Type | Port | Role |
|---|---|---|---|
| MySQL | StatefulSet + Service | 3306 | Primary database with persistent storage and health monitoring |
| WordPress | Deployment | 80 | 3-replica application with resource limits and readiness probes |
| ConfigMap | ConfigMap | - | Non-sensitive WordPress configuration values |
| Secrets | Secret | - | WordPress authentication keys and database credentials |
| ClusterIP Service | Service | - | Internal access to WordPress pods |
| LoadBalancer Service | Service | - | External entry point for WordPress traffic |
| PersistentVolumeClaim | PersistentVolumeClaim | - | Persistent storage for WordPress files and MySQL data |
| ClusterIssuer | ClusterIssuer | - | Automated Let's Encrypt TLS certificate provisioning |
| Ingress | Ingress | 443 | HTTPS termination with session affinity routing |
| Horizontal Pod Autoscaler | HorizontalPodAutoscaler | - | Dynamic scaling based on CPU and memory metrics |
| Backup CronJob | CronJob | - | Scheduled backups for database and WordPress files |
## Architecture Overview
MySQL runs as a StatefulSet with persistent storage and health probes for stable database identity across restarts. WordPress runs as a 3-replica Deployment behind ClusterIP and LoadBalancer Services with session affinity so each user consistently reaches the same pod. An NGINX Ingress handles TLS termination via Let's Encrypt. The HPA adjusts WordPress replica counts based on CPU and memory usage. CronJobs handle scheduled backups for both MySQL and the WordPress file volume.
## Prerequisites
- Minimum 3 Kubernetes worker nodes
- NGINX Ingress Controller installed
- cert-manager installed and configured for Let's Encrypt
- Storage class configured for dynamic PVC provisioning
- A domain name pointed at your cluster's ingress IP
- KubeKanvas CLI installed and running on your computer (Optional, if you want to use one-click deployment)
## How to Deploy
1. Click on the button at the top right corner of this screen to load the manifest into the editor.
2. Update the Secret component with your MySQL credentials, database name, and WordPress authentication keys and salts.
3. Replace domain name placeholders in the Ingress and ClusterIssuer with your values.
4. Confirm the storage class name in the PVC definitions matches what is available in your cluster.
5. Deploy the template to your cluster via the **Play** button in the top right bar. If you prefer to deploy manually, download the YAML and apply it with kubectl.
6. Wait for all pods to reach Running status. You can monitor progress in the Release Monitor screen.
## How to Test
1. Confirm WordPress and MySQL pods are running and PVCs are bound: `kubectl get pods,pvc -n <namespace>`.
2. Visit `https://<your-domain>/wp-admin` and verify the WordPress login screen loads over HTTPS.
3. Log in and confirm the WordPress admin dashboard is accessible.
4. Check the HPA is reporting metrics.
## Use Cases
- **Multi-replica WordPress deployment:** Running 3 WordPress replicas with session affinity so individual pod failures do not interrupt user sessions.
- **Autoscaled content sites:** Deployments where WordPress replica count needs to increase automatically under CPU or memory load.
- **Backup-enabled WordPress clusters:** Setups that need daily automated backups of both the database and uploaded media without external tooling.
- **Declarative WordPress infrastructure:** Replacing managed WordPress hosting with a fully manifest-driven Kubernetes setup.
## Summary
This template configures a 3-replica WordPress deployment on Kubernetes backed by a MySQL StatefulSet, with Let's Encrypt TLS, horizontal autoscaling, and scheduled database and file backups preconfigured. For a full walkthrough, read [High-Availability WordPress Template for Deployment on Kubernetes](https://www.kubekanvas.io/templates/high-availability-wordpress-template-for-deployment-on-kubernetes)
WordpressMySQLHigh available+1 more
Deploy Keycloak with PostgreSQL on Kubernetes: IAM Template
37 usesDeploying Keycloak on Kubernetes with a persistent backend requires a PostgreSQL StatefulSet, NetworkPolicies to isolate the database, and an Ingress to expose the auth endpoints externally. This template configures all of that in a single manifest, giving you a complete deploy Keycloak on Kubernetes setup with PostgreSQL persistence, network-level database isolation, and external access to the Keycloak admin console and authentication endpoints.
## What's Included
| Component | Type | Port | Role |
|---|---|---|---|
| Keycloak | Deployment | 8080 | Identity and access management application |
| ConfigMap | ConfigMap | - | Keycloak image and environment configuration |
| PostgreSQL | StatefulSet + Service | 5432 | Backend database with persistent storage |
| PostgreSQL PVC | PersistentVolumeClaim | - | Persistent storage for PostgreSQL data |
| Network Policy | NetworkPolicy | - | Restricts database access to Keycloak pods only |
| Ingress | Ingress | 80/443 | External access to Keycloak auth and admin endpoints |
## Architecture Overview
Keycloak runs as a Deployment configured via a ConfigMap that sets the database connection details and runtime environment. PostgreSQL runs as a StatefulSet with a PVC for data durability, exposed internally via a headless Service. A NetworkPolicy enforces that only the Keycloak pod can reach the PostgreSQL port, blocking all other cluster traffic to the database. The NGINX Ingress routes external requests to the Keycloak Service for authentication and admin console access.
## Prerequisites
- A running Kubernetes cluster
- NGINX Ingress Controller installed
- A domain name pointed at your cluster's ingress IP
- KubeKanvas CLI installed and running on your computer (Optional, if you want to use one-click deployment)
## How to Deploy
1. Click on the button at the top right corner of this screen to load the manifest into the editor.
2. Update the ConfigMap with your PostgreSQL connection details and Keycloak admin credentials.
3. Verify the NetworkPolicy label selectors match the pod labels in your Deployment and namespace.
4. Set your domain name in the Ingress configuration.
5. Deploy the template to your cluster via the **Play** button in the top right bar. If you prefer to deploy manually, download the YAML and apply it with kubectl.
6. Wait for all pods to reach Running status. You can monitor progress in the Release Monitor screen.
## How to Test
1. Confirm Keycloak and PostgreSQL pods are running either using release monitor screen or using kubectl: `kubectl get pods -n <namespace>`.
2. Open `https://<your-domain>/auth/admin` and verify the Keycloak admin console loads.
3. Log in with your admin credentials and confirm the master realm is accessible.
## Use Cases
- **Cluster-internal SSO provider:** Running Keycloak as a centralized OpenID Connect and OAuth2 server for multiple applications on the same cluster.
- **Network-isolated IAM database:** Enforcing that PostgreSQL is only reachable from the Keycloak pod using NetworkPolicy, with no other in-cluster access.
- **Declarative identity management:** Managing Keycloak deployment and configuration as Kubernetes manifests within a GitOps workflow.
- **Self-hosted OAuth2 server:** Replacing a third-party identity provider with a cluster-native Keycloak instance backed by a persistent database.
## Summary
This template configures a Keycloak deployment on Kubernetes backed by a PostgreSQL StatefulSet, with NetworkPolicy-enforced database isolation and external ingress routing preconfigured.
keycloak
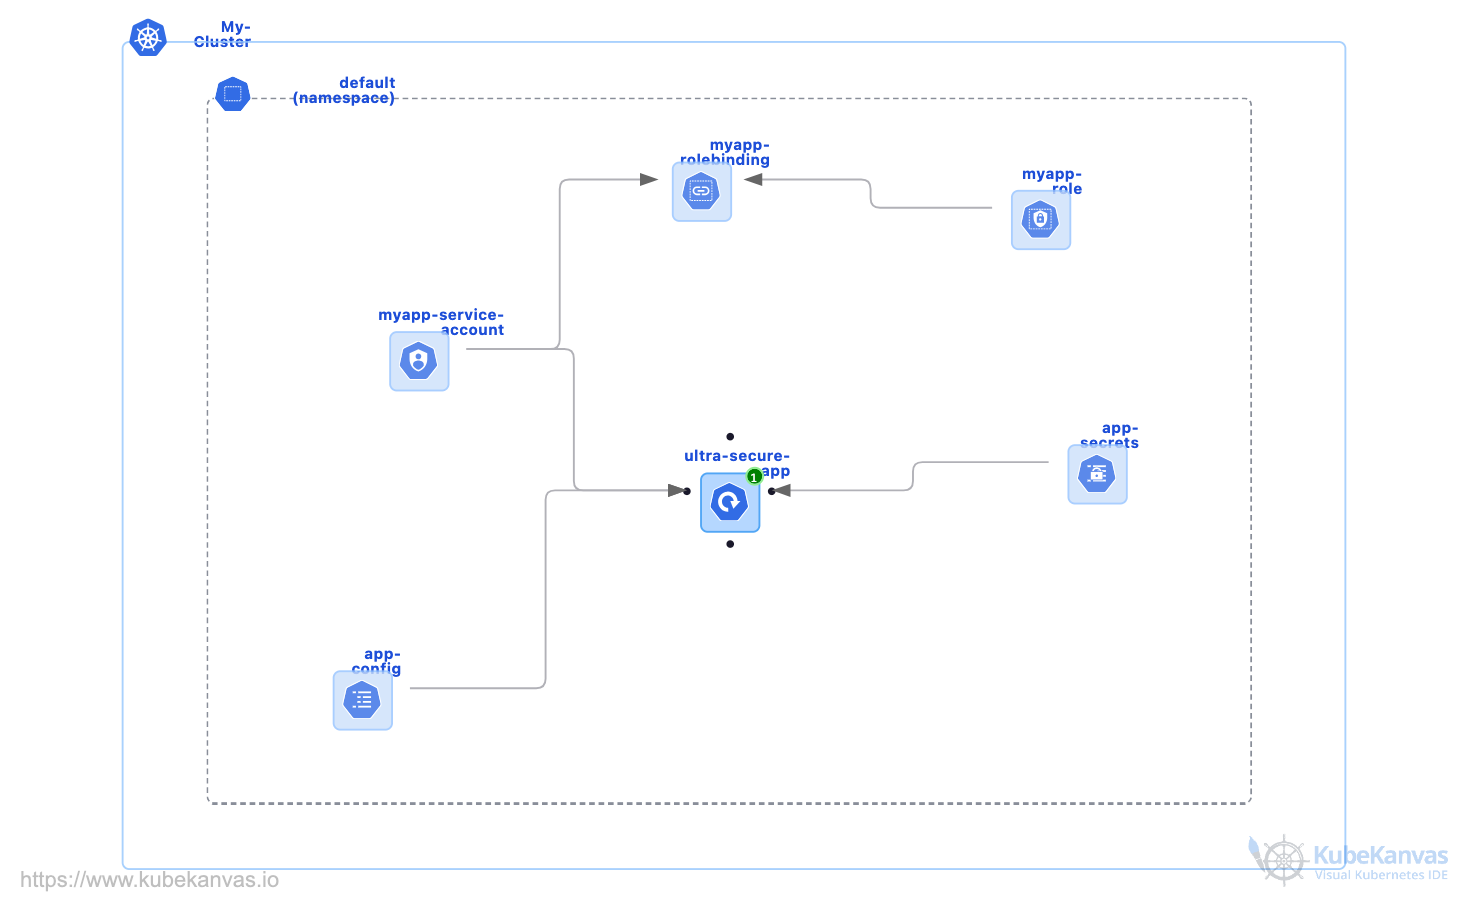
Ultra Secure Kubernetes Pod: Security-Hardened Deployment Template
24 usesHardening a Kubernetes pod against common attack vectors requires configuring security contexts, RBAC, Linux security modules, image policies, resource limits, and secret management together. This template implements the full set of Kubernetes pod security best practices in a single deployable manifest, covering non-root execution, read-only filesystems, seccomp and AppArmor profiles, SELinux labels, least-privilege RBAC, and volume-mounted secrets with restricted permissions.
## What's Included
| Component | Type | Port | Role |
|---|---|---|---|
| ServiceAccount | ServiceAccount | - | Minimal-permission identity with API token mounting disabled |
| Role + RoleBinding | RBAC | - | Least-privilege permissions bound to the ServiceAccount |
| Secret | Secret | - | Credentials injected as environment variables and volume-mounted files |
| Deployment | Deployment | - | Hardened pod with all security controls applied |
## Architecture Overview
The pod runs as UID 1000 with privilege escalation disabled and a read-only root filesystem backed by temporary writable volumes. A dedicated ServiceAccount with a Role and RoleBinding applies minimal RBAC permissions and disables automatic API token mounting. Sensitive data is injected as environment variables from SecretRefs and as volume-mounted files with 0400 permissions. Seccomp runtime default, AppArmor enforcement, and SELinux multi-level labels provide OS-level confinement. CPU, memory, and ephemeral storage limits prevent resource exhaustion.
## Prerequisites
- A Kubernetes cluster with AppArmor and SELinux support enabled on worker nodes
- A private container registry with a pinned application image
- KubeKanvas CLI installed and running on your computer (Optional, if you want to use one-click deployment)
## How to Deploy
1. Click on the button at the top right corner of this page to load the manifest into the editor.
2. Replace the image reference with your pinned application image from your container registry.
3. Update the Secret component with your application credentials and sensitive configuration.
4. Review the Role and RoleBinding to confirm the RBAC permissions match your application's requirements.
5. Deploy the template to your cluster via the **Play** button in the top right bar. If you prefer to deploy manually, download the YAML and apply it with kubectl.
6. Wait for all pods to reach Running status. You can monitor progress in the Release Monitor screen.
## How to Test
1. Verify the pod is running as non-root: `kubectl exec -n <namespace> <pod> -- id` should return `uid=1000`.
2. Confirm the root filesystem is read-only: `kubectl exec -n <namespace> <pod> -- touch /test` should return a permission denied error.
3. Check the seccomp profile is applied: `kubectl get pod <pod> -n <namespace> -o jsonpath='{.spec.securityContext.seccompProfile}'`.
4. Verify no API token is auto-mounted: `kubectl exec -n <namespace> <pod> -- ls /var/run/secrets/kubernetes.io/serviceaccount/` should return empty or not found.
## Use Cases
- **Security baseline for new services:** Using this template as the starting point for any new Deployment to avoid common pod security misconfigurations.
- **CIS benchmark compliance:** Configuring a pod that meets CIS Kubernetes Benchmark requirements for workload-level security controls.
- **Restricted multi-tenant clusters:** Running workloads on shared clusters where strict pod isolation between tenants is required at the OS level.
- **Auditable secret handling:** Storing all credentials in Kubernetes Secrets with 0400 volume-mount permissions rather than passing them as plaintext environment variables.
## Summary
This template configures a Kubernetes pod with the full set of security controls applied at the container, identity, OS, and resource level. For a full walkthrough, read [Securing Kubernetes Pods: A Complete Guide to Pod-Level Security Configuration](https://www.kubekanvas.io/blog/securing-kubernetes-pods-a-complete-guide-to-pod-level-security-configuration).
Pod SecuritySecurity through manifest
Deploy Postgresql in Kubernetes with backup
1 useDeploying PostgreSQL as a standard Kubernetes Deployment does not guarantee stable pod identity or reliable storage reattachment after restarts. This template deploys PostgreSQL 15 as a StatefulSet with a PersistentVolumeClaim, a headless Service for stable DNS, externalized credentials, a readiness probe, and a scheduled backup CronJob, giving you a production-grade PostgreSQL deployment on Kubernetes that maintains data integrity across pod restarts.
## What's Included
| Component | Type | Port | Role |
|---|---|---|---|
| PostgreSQL 15 | StatefulSet | 5432 | Primary database with stable pod identity and persistent storage |
| PersistentVolumeClaim | PersistentVolumeClaim | - | ReadWriteOnce data volume that reattaches after pod restarts |
| Headless Service | Service | - | Stable DNS resolution for direct pod addressing |
| ConfigMap | ConfigMap | - | Database name and user configuration |
| Secret | Secret | - | Password injected as environment variable at runtime |
| Backup CronJob | CronJob | - | Scheduled database backups |
## Architecture Overview
PostgreSQL 15 runs as a StatefulSet so each pod gets a stable name (postgres-0) and DNS address via the headless Service (postgres-0.postgres-headless). A PVC with ReadWriteOnce access mode binds to the pod and reattaches automatically after restarts. The ConfigMap holds the database name and user, while a Kubernetes Secret injects the password at runtime. A readiness probe using `pg_isready` gates traffic until the database is ready to accept connections. A CronJob handles scheduled backups.
## Prerequisites
- A running Kubernetes cluster
- Storage class configured for dynamic PVC provisioning
- KubeKanvas CLI installed and running on your computer (Optional, if you want to use one-click deployment)
## How to Deploy
1. Click on the button at the top right corner of this page to load the manifest into the editor.
2. Update the ConfigMap with your database name and username.
3. Replace the password placeholder in the Secret with your base64-encoded PostgreSQL password.
4. Confirm the storage class in the PVC definition matches what is available in your cluster.
5. Deploy the template to your cluster via the **Play** button in the top right bar. If you prefer to deploy manually, download the YAML and apply it with kubectl.
6. Wait for all pods to reach Running status. You can monitor progress in the Release Monitor screen.
## How to Test
1. Confirm the StatefulSet pod is running and the PVC is bound: `kubectl get pods,pvc -n <namespace>`.
2. Open a shell on the pod: `kubectl exec -it postgres-0 -n <namespace> -- psql -U <username> -d <dbname>`.
3. Run `\l` to list databases and verify your configured database exists.
4. Run `SELECT version();` to confirm PostgreSQL 15 is running.
## Use Cases
- **Stateful database workloads:** Replacing a PostgreSQL Deployment with a StatefulSet to guarantee stable pod identity and persistent storage across restarts.
- **Backup-enabled database setup:** Running PostgreSQL on Kubernetes with scheduled CronJob backups without additional external tooling.
- **Direct pod addressing:** Applications that need to connect to a specific PostgreSQL pod by DNS using the headless Service endpoint.
- **Credential-isolated configuration:** Projects that require the database password stored in a Kubernetes Secret rather than hardcoded in manifests.
## Summary
This template configures a PostgreSQL 15 StatefulSet on Kubernetes with persistent storage, stable DNS via a headless Service, externalized credentials, and scheduled backups.
PostgresqlStatefulsetPostgresql with backup
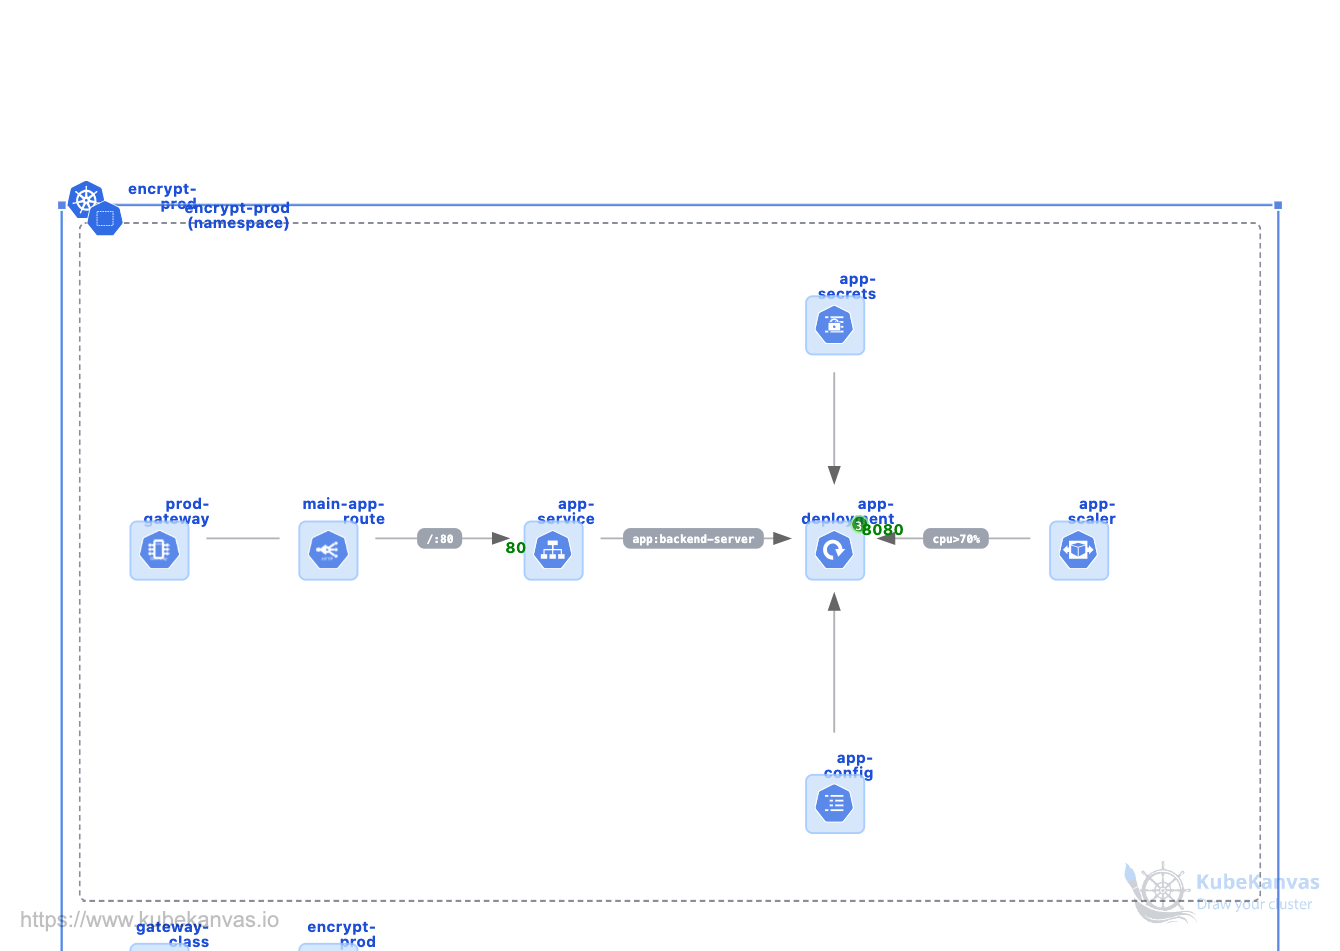
Gateway API Application Stack on Kubernetes: Modern Routing Template
3 usesThe Kubernetes Ingress API handles basic HTTP routing but requires vendor-specific annotations for advanced features and mixes infrastructure and routing concerns into a single object. This template deploys a full application stack using the Kubernetes Gateway API, including a GatewayClass, a Gateway for HTTPS traffic, an HTTPRoute for L7 routing, automated TLS via cert-manager, and a ConfigMap-backed application service.
## What's Included
| Component | Type | Port | Role |
|---|---|---|---|
| GatewayClass | GatewayClass | - | Defines the infrastructure provider and gateway configuration standards |
| Gateway (prod-gateway) | Gateway | 443 | External HTTPS traffic entry point |
| HTTPRoute (main-app-route) | HTTPRoute | - | L7 routing rules directing traffic to backend services |
| ClusterIssuer | ClusterIssuer | - | Automated Let's Encrypt TLS certificate provisioning |
| TLS Secret | Secret | - | SSL/TLS certificate storage |
| App Secrets | Secret | - | Sensitive application configuration |
| ConfigMap (app-config) | ConfigMap | - | Non-sensitive environment variables |
| Service | Service | - | Stable DNS routing to application pods |
## Architecture Overview
The GatewayClass defines the infrastructure provider and is cluster-scoped. The prod-gateway Gateway listens on port 443 and terminates TLS using a certificate provisioned by cert-manager via Let's Encrypt. HTTPRoutes attach to the Gateway and define L7 routing rules that direct traffic to the backend Service. Application configuration is split between a ConfigMap for non-sensitive values and a Kubernetes Secret for credentials.
## Why Gateway API
Kubernetes Ingress was designed for simple HTTP routing and depends on vendor-specific annotations for anything beyond basic path and host matching. Over time, annotation sprawl makes Ingress configurations fragile and tightly coupled to a specific controller. Gateway API solves this by replacing annotations with structured Kubernetes objects and separating responsibilities across three layers: the GatewayClass is owned by the infrastructure provider or cluster admin, the Gateway is managed by the platform team, and HTTPRoutes are configured by application developers. This means each team manages only the objects within their scope, without touching shared infrastructure.
## Prerequisites
- A Kubernetes cluster with a Gateway API compatible controller installed (e.g. Envoy Gateway, Istio, or NGINX Gateway Fabric)
- cert-manager installed and configured for Let's Encrypt
- A domain name pointed at your cluster's Gateway IP
- KubeKanvas CLI installed and running on your computer (Optional, if you want to use one-click deployment)
## How to Deploy
1. Click on the button at the top right corner of this page to load the manifest into the editor.
2. Update the GatewayClass name to match the controller installed on your cluster.
3. Set your domain name in the Gateway and HTTPRoute configuration.
4. Update the ClusterIssuer with your email address for Let's Encrypt certificate registration.
5. Add your application credentials to the App Secrets component.
6. Deploy the template to your cluster via the **Play** button in the top right bar. If you prefer to deploy manually, download the YAML and apply it with kubectl.
7. Wait for all pods to reach Running status. You can monitor progress in the Release Monitor screen.
## How to Test
1. Verify the Gateway has been assigned an external IP: `kubectl get gateway -n <namespace>`.
2. Confirm the TLS certificate has been issued: `kubectl describe certificate -n <namespace>`.
3. Send an HTTPS request to your domain and verify the application responds: `curl -I https://<your-domain>`.
4. Check the HTTPRoute status shows Accepted: `kubectl describe httproute -n <namespace>`.
## Use Cases
- **Multi-team routing management:** Allowing application developers to manage their own HTTPRoutes without requiring access to the shared Gateway or GatewayClass objects.
- **Advanced L7 routing:** Implementing traffic splitting, header-based routing, or weighted backends that Ingress cannot express without annotations.
- **Ingress migration:** Replacing annotation-heavy Ingress configurations with structured Gateway API objects that have explicit role separation.
- **Controller-agnostic routing:** Using a routing model that works consistently across different Gateway implementations (Envoy, Istio, NGINX) without changing the HTTPRoute definitions.
## Summary
This template configures a Kubernetes Gateway API application stack with HTTPS termination, automated TLS, and L7 routing separated across GatewayClass, Gateway, and HTTPRoute objects. For a full walkthrough, read [Migrating from Ingress to Gateway API: The Modern Way to Expose Kubernetes Services](https://www.kubekanvas.io/blog/migrating-from-ingress-to-gateway-api-the-modern-way-to-expose-kubernetes-services)
#Kubernetes#GatewayAPI#CloudNative+3 more
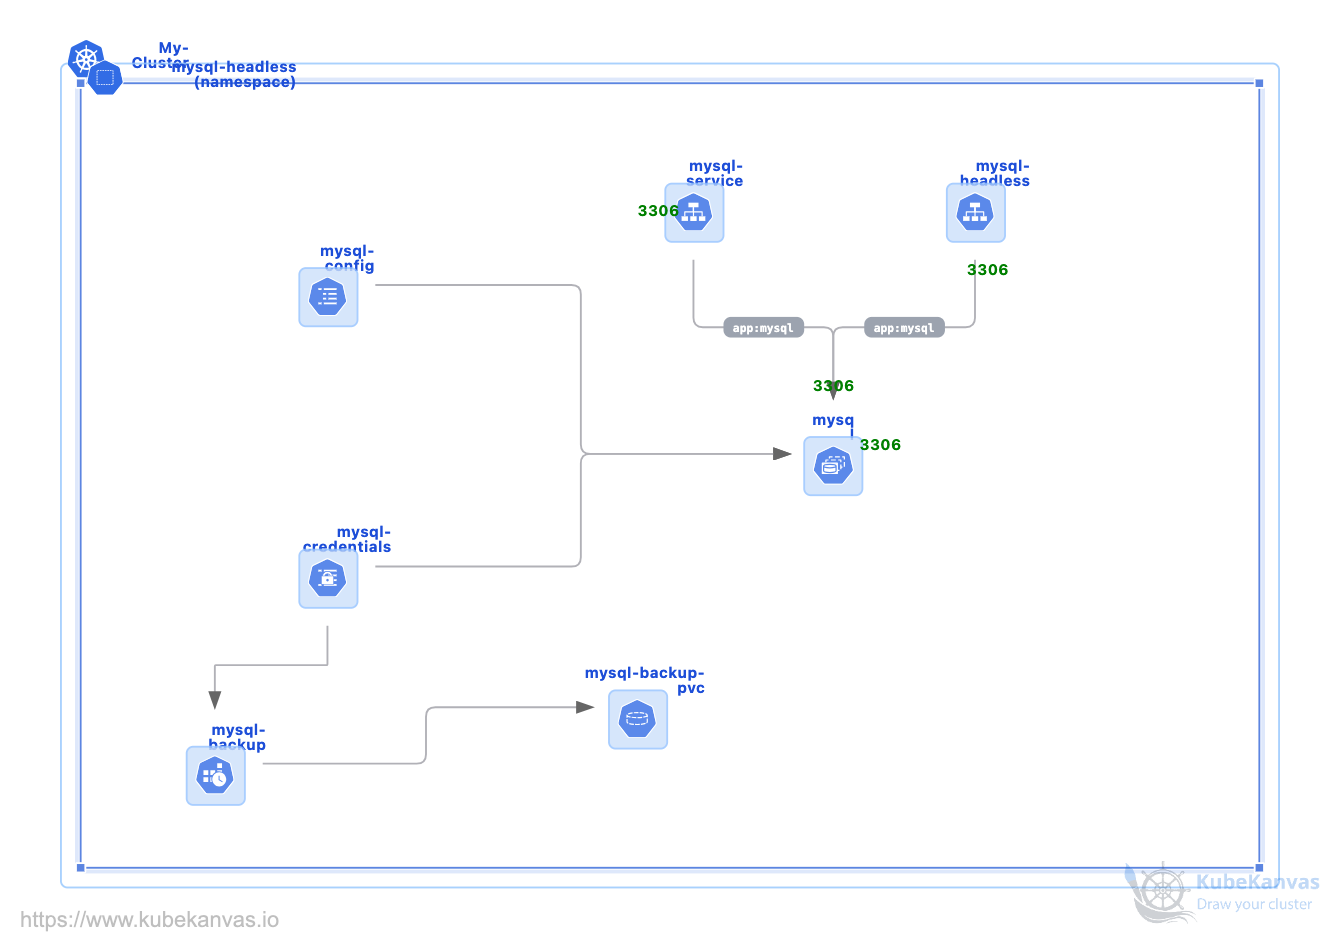
Deploy MySQL on Kubernetes with Backup: StatefulSet Template
0 usesRunning MySQL on Kubernetes as a standard Deployment does not guarantee stable pod identity or ordered lifecycle management, which can lead to data inconsistency and storage reattachment failures. This template deploys MySQL 8.0 as a StatefulSet with VolumeClaimTemplates, a headless Service for stable DNS, a ClusterIP Service for load-balanced connections, a non-root security context, externalized credentials, and a scheduled backup CronJob.
## What's Included
| Component | Type | Port | Role |
|---|---|---|---|
| MySQL 8.0 | StatefulSet | 3306 | Primary database with stable pod identity and ordered lifecycle |
| PVC (via VolumeClaimTemplates) | PersistentVolumeClaim | - | Automatically provisioned persistent storage per pod |
| Headless Service | Service | - | Stable DNS for direct pod addressing (mysql-0.mysql-headless) |
| ClusterIP Service | Service | 3306 | Load-balanced access for standard database connections |
| ConfigMap | ConfigMap | - | Non-sensitive database name configuration |
| Secret | Secret | - | MySQL credentials injected at runtime |
| Backup CronJob | CronJob | - | Scheduled database backups |
## Architecture Overview
MySQL 8.0 runs as a StatefulSet with VolumeClaimTemplates that automatically provision a PVC per pod. A headless Service provides stable DNS addresses (mysql-0.mysql-headless.default.svc.cluster.local) for clients that require a direct connection to a specific pod. A standard ClusterIP Service handles load-balanced traffic for general database clients. The ConfigMap stores the database name and the Secret injects credentials at runtime. A SecurityContext enforces non-root execution at UID 1001. A CronJob handles scheduled backups.
## Prerequisites
- A running Kubernetes cluster
- Storage class configured for dynamic PVC provisioning
- KubeKanvas CLI installed and running on your computer (Optional, if you want to use one-click deployment)
## How to Deploy
1. Click **Use Template** to load the manifest into the editor.
2. Update the ConfigMap with your database name.
3. Replace the credential placeholders in the Secret with your base64-encoded MySQL username and password.
4. Confirm the storage class in the VolumeClaimTemplates matches what is available in your cluster.
5. Deploy the template to your cluster via the **Play** button in the top right bar. If you prefer to deploy manually, download the YAML and apply it with kubectl.
6. Wait for all pods to reach Running status. You can monitor progress in the Release Monitor screen.
## How to Test
1. Confirm the StatefulSet pod is running and the PVC is bound: `kubectl get pods,pvc -n <namespace>`.
2. Open a MySQL shell on the pod: `kubectl exec -it mysql-0 -n <namespace> -- mysql -u <username> -p`.
3. Run `SHOW DATABASES;` to confirm your configured database is listed.
4. Run `SELECT VERSION();` to verify MySQL 8.0 is running.
## Use Cases
- **Stateful MySQL workloads:** Replacing a MySQL Deployment with a StatefulSet for guaranteed stable pod naming and reliable PVC reattachment across restarts.
- **Dual-access database setup:** Applications that need both direct pod addressing via the headless Service and load-balanced access via the ClusterIP Service simultaneously.
- **Backup-enabled database deployment:** Running MySQL on Kubernetes with automated CronJob backups built in from day one.
- **Non-root database containers:** Environments that require all database processes to run as a non-root user as part of a security policy.
## Summary
This template configures a MySQL 8.0 StatefulSet on Kubernetes with automatic persistent storage, dual-service networking, a non-root security context, externalized credentials, and scheduled backups.
#MySQL#StatefulSet#CronJob+1 more
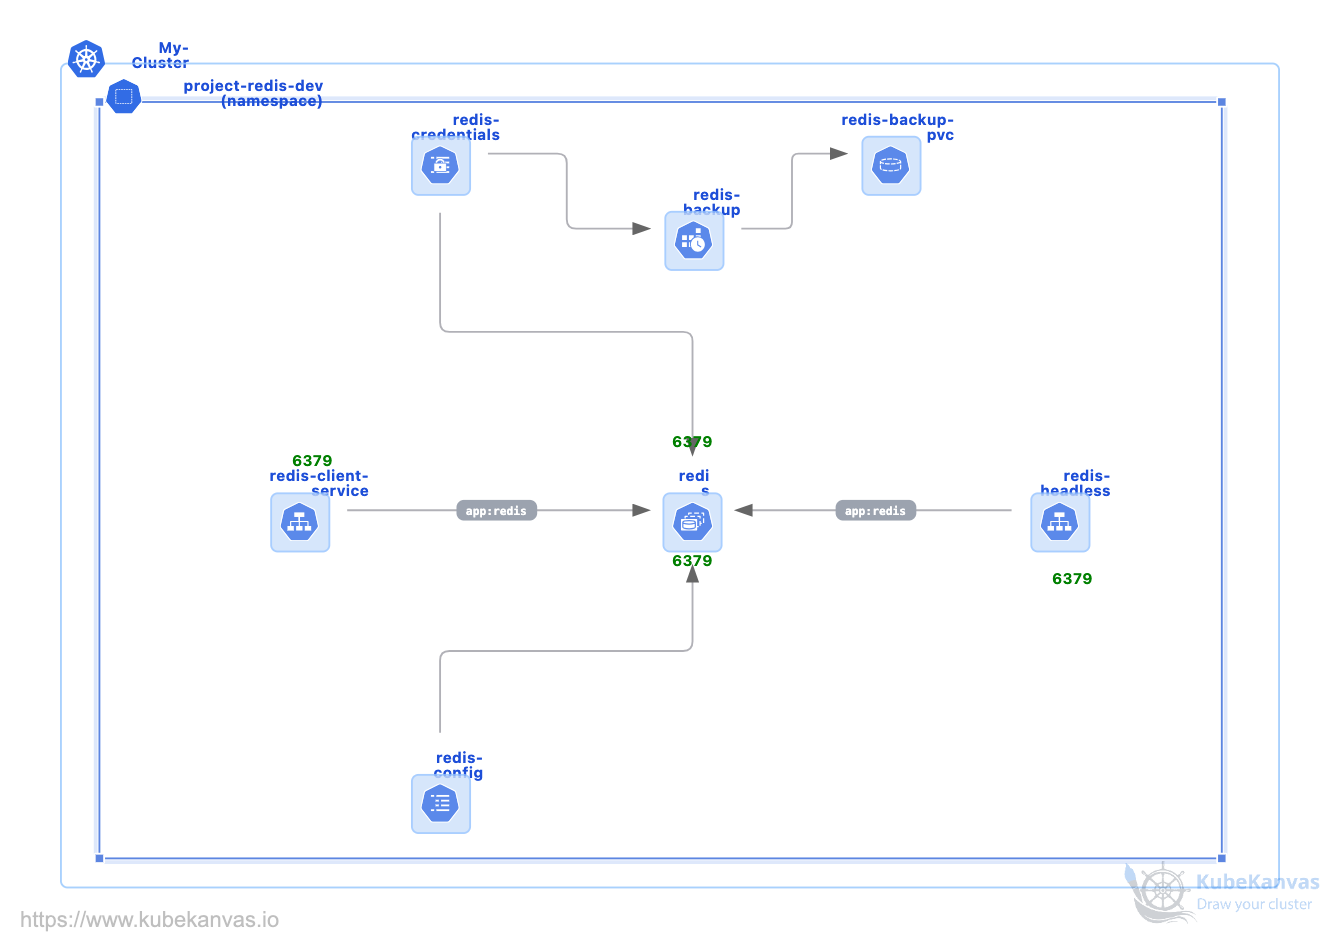
Deploy Redis on Kubernetes: StatefulSet with Client Service Access
14 usesDeploying Redis on Kubernetes requires a StatefulSet for stable pod identity across restarts and a dedicated client service for load-balanced access from in-cluster applications. This template deploys a 3-replica Redis StatefulSet in a dedicated namespace with password authentication and a ClusterIP service for client connections, and includes step-by-step verification to confirm read/write operations are working correctly.
## What's Included
| Component | Type | Port | Role |
|---|---|---|---|
| Namespace | Namespace | - | Isolates Redis resources in project-redis-dev |
| Redis | StatefulSet | 6379 | 3-replica cluster with stable pod identity and password authentication |
| redis-client-service | ClusterIP Service | 6379 | Load-balanced client access across all Redis pods |
## Architecture Overview
Redis runs as a 3-replica StatefulSet (redis-0, redis-1, redis-2) inside the project-redis-dev namespace, providing stable pod naming and ordered startup. A ClusterIP Service (redis-client-service) on port 6379 distributes client connections across the running Redis pods. Password authentication is enforced at the Redis level, requiring clients to authenticate before issuing commands.
## Prerequisites
- A running Kubernetes cluster (e.g Docker Desktop)
- KubeKanvas CLI installed and running on your computer (Optional, if you want to use one-click deployment)
## How to Deploy
1. Click on the button at the top right corner of this page to load the manifest into the editor.
2. Update the Redis password in the configuration to replace the default value.
3. Adjust the replica count in the StatefulSet if your workload requires fewer or more instances.
4. Deploy the template to your cluster via the **Play** button in the top right bar. If you prefer to deploy manually, download the YAML and apply it with kubectl.
5. Wait for all pods to reach Running status. You can monitor progress in the Release Monitor screen.
## How to Test
1. Confirm all three Redis pods are running: `kubectl get pods -n project-redis-dev` — you should see redis-0, redis-1, and redis-2 in Running status.
2. Launch a temporary Alpine Redis client pod with auto-deletion: `kubectl run redis-client --rm -it --image=redis:alpine --restart=Never -n project-redis-dev -- sh`.
3. Inside the pod, connect to Redis via the client service: `redis-cli -h redis-client-service -p 6379 -a mypassword`.
4. Run `PING` and confirm the response is `PONG`, verifying the connection is established.
5. Write a test key: `SET testkey "hello"` and confirm the response is `OK`.
6. Read the key back: `GET testkey` and confirm it returns `"hello"`, verifying read/write operations.
7. Exit the client with `QUIT`, then type `exit` to leave and auto-delete the test pod.
## Use Cases
- **In-cluster cache deployment:** Running Redis as a StatefulSet for applications that need a persistent, named cache backend accessible by DNS.
- **Client service access pattern:** Exposing Redis to other pods through a dedicated ClusterIP service rather than targeting individual pod IPs directly.
- **Read/write validation workflow:** Confirming a Redis deployment is functional end-to-end using a temporary client pod without installing Redis locally.
- **Namespace-isolated cache layer:** Running Redis in a dedicated namespace to keep it separate from application workloads with clear network boundaries.
## Summary
This template configures a 3-replica Redis StatefulSet on Kubernetes in a dedicated namespace with password authentication and a ClusterIP service for load-balanced client access.
RedisStatefulSetKubernetes+2 more
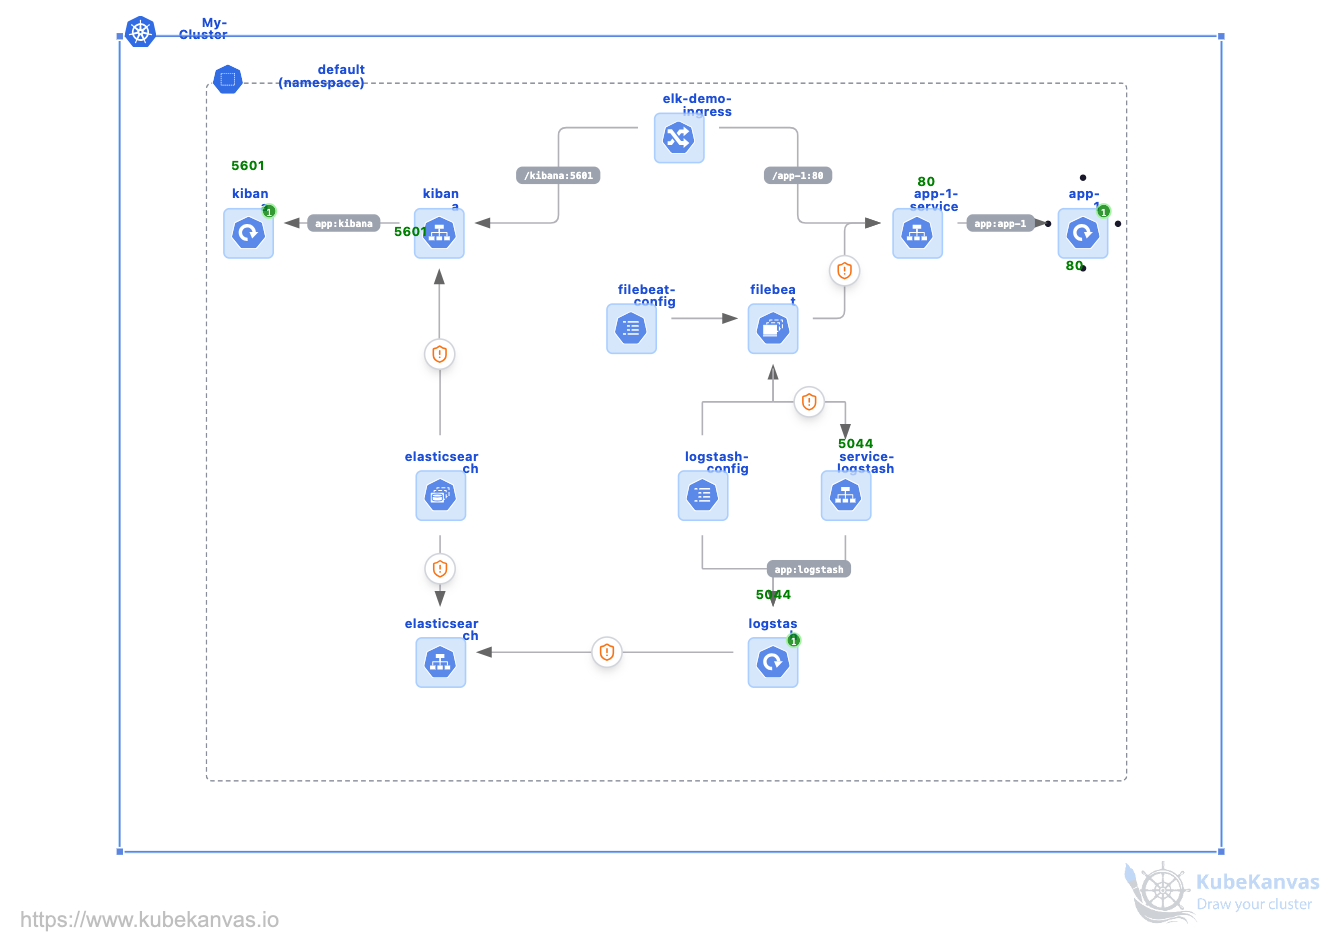
ELK Stack on Kubernetes: Nginx Log Collection and Visualization
3 usesCollecting, parsing, storing, and visualizing application logs on Kubernetes requires wiring together multiple components in a specific sequence. This template deploys a complete ELK stack on Kubernetes for Nginx log monitoring, including Filebeat for log collection, Logstash for parsing, Elasticsearch for storage, and Kibana for visualization, all preconfigured as a working pipeline on Docker Desktop Kubernetes.
## What's Included
| Component | Type | Port | Role |
|---|---|---|---|
| Nginx | Deployment + Service | 80 | Application server generating logs at /var/log/nginx |
| Filebeat | Deployment | - | Log collection agent that forwards entries to Logstash |
| Logstash | Deployment + Service | 5044 | Log parsing and transformation pipeline |
| Elasticsearch | StatefulSet + Service | 9200 | Log storage and search backend |
| Kibana | Deployment + Service | 5601 | Log visualization and query interface |
| Ingress | Ingress | 80 | Routes external traffic to Nginx and Kibana at http://elk.local/ |
## Architecture Overview
Nginx generates access and error logs at /var/log/nginx. Filebeat tails those log files and ships entries to Logstash over port 5044. Logstash parses and transforms the raw log data before forwarding it to Elasticsearch, which indexes and stores the logs for search. Kibana connects to Elasticsearch on port 9200 and provides a UI for querying and visualizing the indexed data. An Ingress exposes both Nginx and Kibana externally at http://elk.local/.
## Prerequisites
- Docker Desktop with Kubernetes enabled
- NGINX Ingress Controller installed
- `elk.local` added to your /etc/hosts file pointing at 127.0.0.1
- KubeKanvas CLI installed and running on your computer (Optional, if you want to use one-click deployment)
## How to Deploy
1. Click on the button at the top right corner of this page to load the manifest into the editor.
2. Add `127.0.0.1 elk.local` to your /etc/hosts file before deploying.
3. Review the Filebeat configuration to confirm the log path matches the Nginx log volume mount.
4. Deploy the template to your cluster via the **Play** button in the top right bar. If you prefer to deploy manually, download the YAML and apply it with kubectl.
5. Wait for all pods to reach Running status. You can monitor progress in the Release Monitor screen.
## How to Test
1. Confirm all five pods are running: `kubectl get pods -n <namespace>` — Nginx, Filebeat, Logstash, Elasticsearch, and Kibana should all show Running.
2. Open `http://elk.local/` in your browser and confirm the Nginx default page loads, generating log entries.
3. Access Kibana at `http://elk.local/` or via port-forward: `kubectl port-forward svc/kibana 5601:5601 -n <namespace>`, then open it at `http://localhost:5601`.
4. In Kibana, go to Discover and create an index pattern for Elasticsearch. Confirm Nginx log entries are appearing.
5. If no logs appear in Kibana, check Filebeat for connectivity errors: `kubectl logs <filebeat-pod> -n <namespace>`.
## Use Cases
- **Nginx log monitoring on Kubernetes:** Collecting and visualizing Nginx access and error logs from a pod without external log infrastructure.
- **ELK stack local development:** Running the full Filebeat, Logstash, Elasticsearch, and Kibana pipeline on Docker Desktop for learning and prototyping.
- **Log pipeline validation:** Testing a Filebeat to Logstash to Elasticsearch pipeline locally before deploying it to a staging or production cluster.
- **Structured log search:** Indexing parsed Nginx logs in Elasticsearch and querying them in Kibana using KQL or Lucene syntax.
## Summary
This template configures a complete ELK stack on Kubernetes for Nginx log collection, parsing, storage, and visualization using Filebeat, Logstash, Elasticsearch, and Kibana.
ElasticsearchKubernetesLog Monitoring+3 more
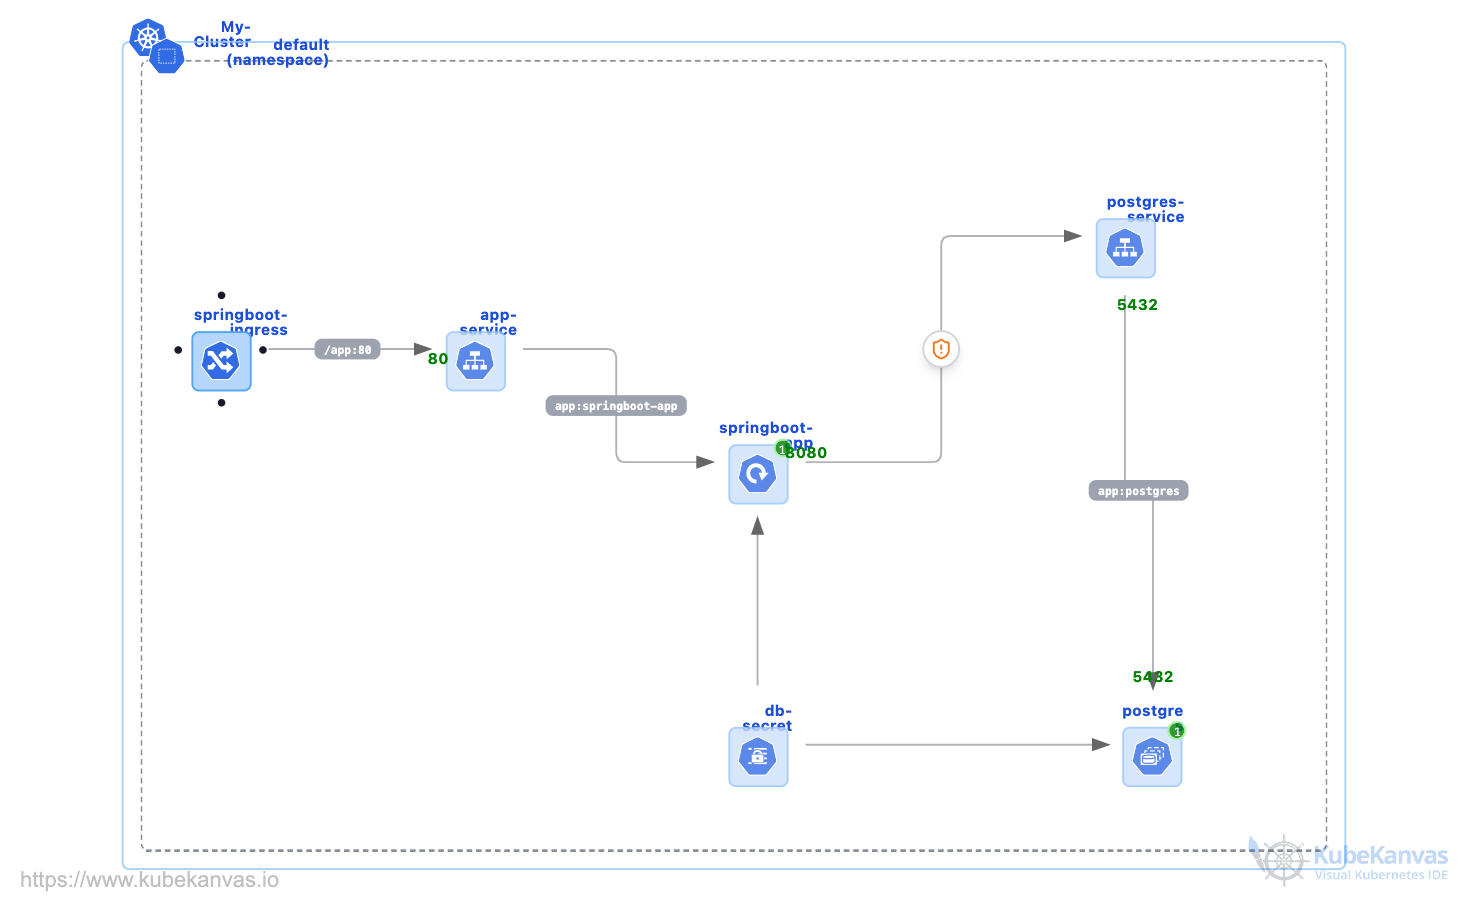
Deploy a Spring Boot Application on Kubernetes with PostgreSQL
4 usesConnecting a Spring Boot application to a PostgreSQL database on Kubernetes requires more than running two pods side by side. The database needs a stable hostname your application can rely on across pod restarts, credentials need to stay out of your container image, and external traffic needs a consistent entry point. This template wires all of that together using a StatefulSet-backed PostgreSQL database, headless DNS for stable database addressing, Kubernetes Secrets for credential injection, and NGINX Ingress for external routing.
## What's Included
| Component | Type | Port | Role |
|---|---|---|---|
| Spring Boot App | Deployment + ClusterIP Service | 8080 | Stateless application tier connecting to PostgreSQL via headless DNS |
| PostgreSQL | StatefulSet | 5432 | Database backend deployed as a StatefulSet for stable pod identity (postgres-0) and guaranteed PVC reattachment |
| Headless Service | Service | - | Gives PostgreSQL a predictable DNS address (postgres-0.postgres-service) that does not change when the pod restarts |
| Secret | Secret | - | Database credentials stored outside the image and injected as environment variables at pod startup |
| NGINX Ingress | Ingress | 80 | Routes external requests to the Spring Boot service at /frontend-service |
## Architecture Overview
The Spring Boot Deployment resolves the database host using the stable DNS name postgres-0.postgres-service, provided by the headless Service pointing directly at the StatefulSet pod. Unlike a standard ClusterIP Service that load-balances across multiple endpoints, the headless Service maps to the specific pod, giving the application a reliable connection target that survives pod restarts. Database credentials are injected from a Kubernetes Secret as environment variables at startup. NGINX Ingress routes external HTTP traffic to the Spring Boot ClusterIP Service at /frontend-service.
## Prerequisites
- A running Kubernetes cluster (Docker Desktop or Minikube)
- NGINX Ingress Controller installed and enabled
- Storage class configured for dynamic PVC provisioning
- KubeKanvas CLI installed and running on your computer (Optional, if you want to use one-click deployment)
## How to Deploy
1. Click **Use Template** to load the manifest into the editor.
2. Update the Secret with your PostgreSQL username and password.
3. Confirm the Ingress host and path match your intended endpoint configuration.
4. Deploy the template to your cluster via the **Play** button in the top right bar. If you prefer to deploy manually, download the YAML and apply it with kubectl.
5. Wait for all pods to reach Running status. You can monitor progress in the Release Monitor screen.
## How to Test
1. Confirm both the Spring Boot and PostgreSQL pods are running: `kubectl get pods -n <namespace>`.
2. Send a request to the application endpoint: `curl http://<ingress-ip>/frontend-service` and confirm a response is returned.
3. Check the Spring Boot pod logs to confirm successful database connection: `kubectl logs <springboot-pod> -n <namespace>`.
4. Verify the Ingress routing is active: `kubectl describe ingress -n <namespace>`.
## Use Cases
- **Spring Boot and PostgreSQL on Kubernetes:** Running a standard Spring Boot and PostgreSQL stack on Kubernetes with database connectivity handled through stable headless DNS instead of hardcoded IP addresses.
- **Stateless app with stateful database:** Separating the application tier as a Deployment from the database tier as a StatefulSet to allow each to scale and restart independently.
- **Credential-isolated Spring Boot deployments:** Injecting database credentials via Kubernetes Secrets rather than baking them into application properties or Docker images.
- **Ingress-routed Java applications:** Using NGINX Ingress as a reverse proxy in front of a Spring Boot service for path-based external access.
## Summary
This template configures a Spring Boot Deployment on Kubernetes connected to a PostgreSQL StatefulSet via headless DNS, with externalized credentials and NGINX Ingress routing for external access. The source code for the Spring Boot starter application is available at [github.com/kubekanvas/deploy-springboot-kubernetes](https://github.com/kubekanvas/deploy-springboot-kubernetes).
springbootingresspostgres+2 more
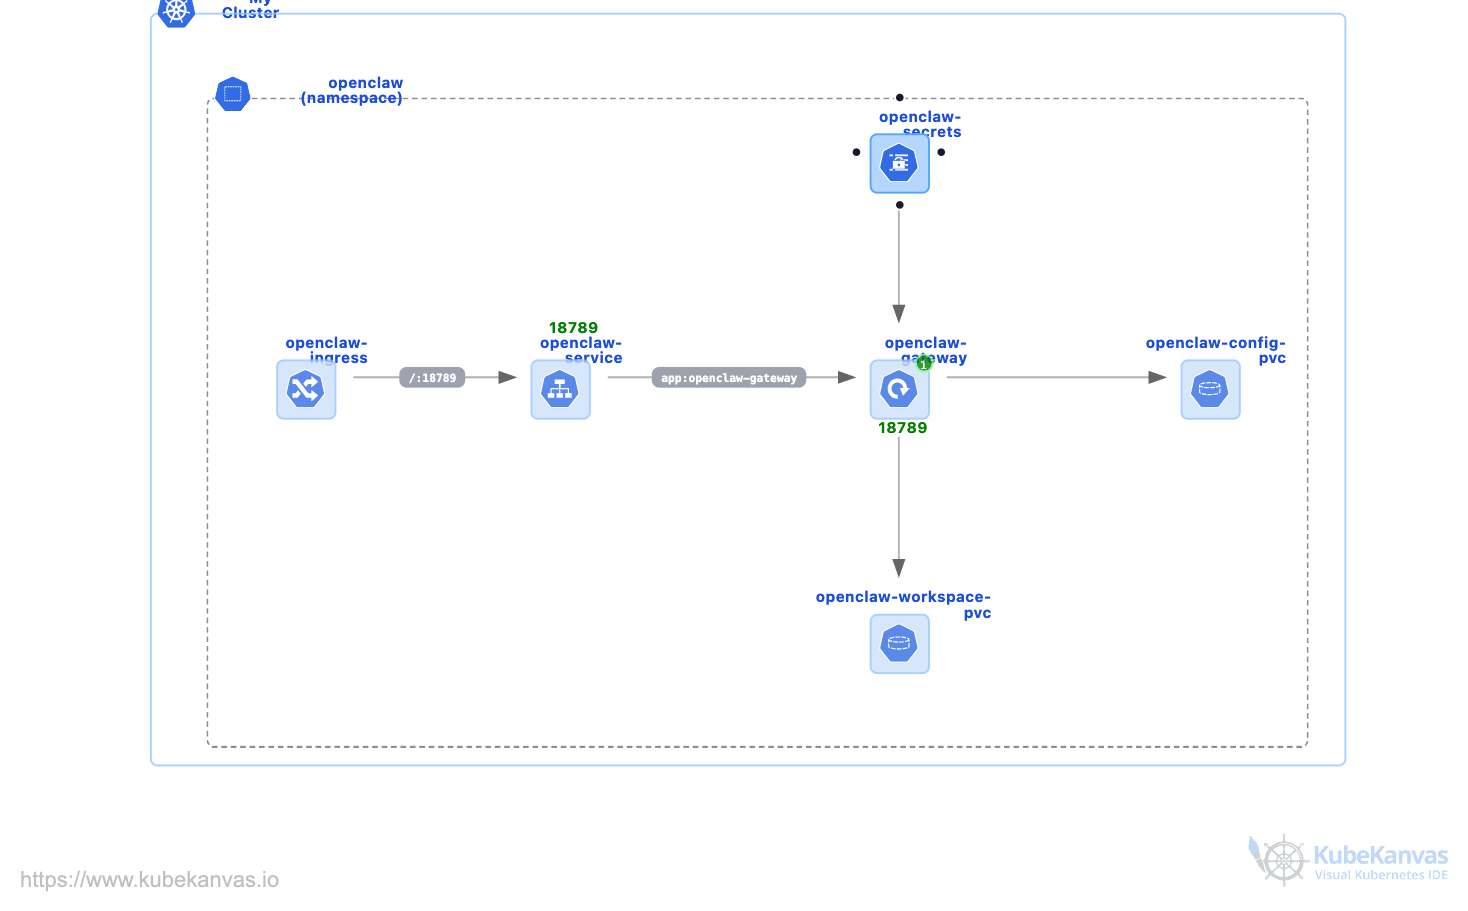
OpenClaw in Kubernetes
2 usesRunning OpenClaw on Kubernetes requires a dedicated namespace, persistent storage for configuration and workspace data, secure API token injection, and an ingress with extended WebSocket timeout support. This template provides a complete single-replica OpenClaw Kubernetes deployment with all of that preconfigured, including TLS termination via cert-manager and 3600-second WebSocket timeouts for long-lived AI agent connections.
## What's Included
| Component | Type | Port | Role |
|---|---|---|---|
| Namespace | Namespace | - | Isolates all OpenClaw resources |
| API Secret | Secret | - | Stores Telegram, Anthropic, and Discord API tokens |
| Config Storage | PersistentVolumeClaim | - | 10Gi volume for OpenClaw configuration data |
| Workspace Storage | PersistentVolumeClaim | - | 20Gi volume for workspace and runtime data |
| OpenClaw | Deployment | - | Single-replica gateway with liveness and readiness probes |
| Service | ClusterIP Service | - | Internal network access to the OpenClaw pod |
| Ingress | NGINX Ingress | 443 | TLS via cert-manager; 3600s WebSocket timeout |
## Architecture Overview
OpenClaw runs as a single-replica Deployment inside its own namespace, backed by two PersistentVolumeClaims for configuration (10Gi) and workspace (20Gi) data. API tokens for Telegram, Anthropic, and Discord are stored in a Kubernetes Secret and injected at pod startup. A ClusterIP Service exposes the pod internally, and an NGINX Ingress handles external traffic with cert-manager TLS and a 3600-second proxy timeout to support persistent WebSocket connections.
## Prerequisites
- Existing Kubernetes cluster with available capacity
- NGINX Ingress Controller installed
- cert-manager installed and configured for Let's Encrypt
- API tokens for Telegram, Anthropic, and/or Discord
- A domain name pointed at your cluster's ingress IP
- KubeKanvas CLI installed and running on your computer (Optional, if you want to use one-click deployment)
## How to Deploy
1. Click on the button at the top right corner of this page to load the manifest into the editor.
2. Add your Telegram, Anthropic, and Discord API tokens to the Secret component.
3. Update the Ingress with your domain name.
4. Adjust PVC sizes if your storage requirements differ from the defaults (10Gi config, 20Gi workspace).
5. Deploy the template to your cluster via the **Play** button in the top right bar. If you prefer to deploy manually, download the YAML and apply it with kubectl.
6. Wait for all pods to reach Running status. You can monitor progress in the Release Monitor screen.
## How to Test
1. Confirm the OpenClaw pod is running. You can monitor the deployment in the Release Monitor screen. Or you can run kubectl command to find out the status of pods:
`kubectl get pods -n openclaw`.
2. Check that the TLS certificate has been issued: `kubectl describe certificate -n openclaw`.
3. Send a test message via your configured Telegram or Discord integration and verify OpenClaw responds.
## Use Cases
- **Self-hosted AI agent gateway:** Running an OpenClaw instance on your own cluster with full control over API token storage and network access.
- **Multi-platform bot backend:** Connecting Telegram and Discord bots to Anthropic AI through a single Kubernetes-managed gateway.
- **GitOps-managed AI workloads:** Managing OpenClaw configuration as Kubernetes manifests within an existing GitOps deployment pipeline.
## Summary
This template configures a namespace-isolated OpenClaw deployment on Kubernetes with persistent storage, secret-based API token management, and WebSocket-ready TLS ingress. For a full walkthrough, read [Deploying OpenClaw in Kubernetes](https://www.kubekanvas.io/blog/deploying-open-claw-in-kubernetes).
OpenClawOpenClaw in Kubernetes
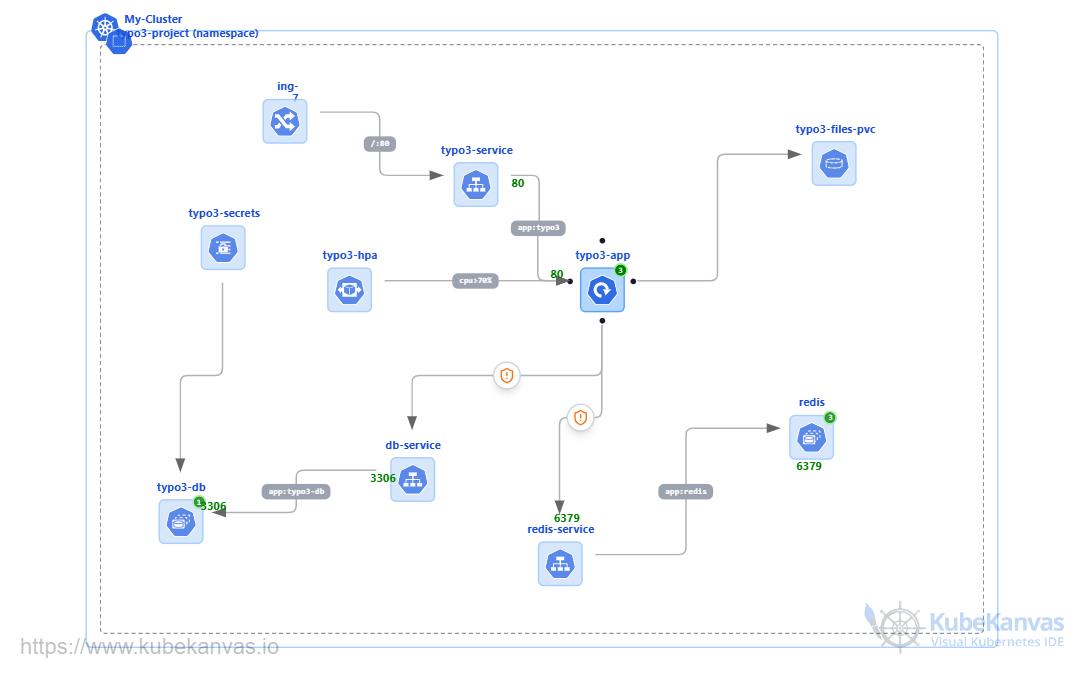
Deploying Typo3 on Kubernetes with visual template and KubeKanvas
1 use### 🛠 Template Overview
This template provides a production-ready blueprint for deploying a highly available **TYPO3** ecosystem. It automates the setup of the CMS, its database, and a high-speed caching layer, ensuring your website is performant and resilient from day one.
**Architecture Components:**
* **TYPO3 App:** A scalable Deployment using the latest v13 image, pre-configured for PHP-Apache.
* **MariaDB:** A StatefulSet for reliable, persistent relational data storage.
* **Redis:** A dedicated caching layer to offload heavy TYPO3 cache tables and sessions from the disk to memory.
* **HPA (Horizontal Pod Autoscaler):** Automatically scales your TYPO3 web workers from 1 to 5 replicas based on real-time CPU demand.
* **Persistence:** Persistent Volume Claims (PVC) ensure that your `/fileadmin` assets survive pod restarts and upgrades.
* **Ingress:** Pre-configured Nginx Ingress routing to provide clean URL access to your TYPO3 frontend and backend.
-----
### Stop Writing YAML, Start Designing
Kubernetes doesn't have to be a wall of text. **KubeKanvas** is a visual IDE for Kubernetes that transforms complex infrastructure into an interactive design board.
* **Drag-and-Drop:** Build your TYPO3 resources visually rather than manually typing every line of YAML.
* **One-Click Deploy:** Push your designs directly to EKS, AKS, GKE, or local Docker Desktop clusters.
### 🚀 Quick Start with KubeKanvas
1. **Launch the Template:** Click the **Get started with this template** button above.
2. **Visualize & Edit:** Use the KubeKanvas interface to tweak HPA thresholds, adjust memory limits, or add Redis replicas visually. To see the platform in action, check out [how KubeKanvas works](https://www.kubekanvas.io/how-kubekanvas-works).
3. **Deploy:** Connect your cluster and use the integrated dashboard to deploy the entire TYPO3 stack in seconds.
-----
### 📄 Manual YAML Configuration
If you prefer the command line, ensure you have a **Namespace** and **Secrets** ready, then apply the manifest:
```bash
kubectl apply -f typo3-stack.yaml
```
**Prerequisite: Metrics Server**
The Horizontal Pod Autoscaler (HPA) requires metrics to function. If your cluster doesn't have it (common on local setups), install it via:
[Install Metrics Server](https://github.com/kubernetes-sigs/metrics-server/releases/latest/download/components.yaml)
**Resource Breakdown:**
This stack resides in the **typo3-project** Namespace for logical isolation. It includes a MariaDB **StatefulSet** for data integrity, a Redis **StatefulSet** for performance, a TYPO3 **Deployment** with integrated **Resource Limits**, and an **Ingress** rule to route traffic to your domain or `localhost`.
-----
### 🔍 Debugging Tips
* **Check Pulse:** Use `kubectl describe pod -n typo3-project` to troubleshoot mounting or scaling issues.
* **View Logs:** Use `kubectl logs -l app=typo3-app -n typo3-project` to debug PHP or database connection errors.
* **Scale Test:** Run a load test to watch the **HPA** spin up new pods automatically when CPU hits 70%.
Deploy Gemma 4 + Ollama on Kubernetes Via Kubekanvas: Local AI Stack
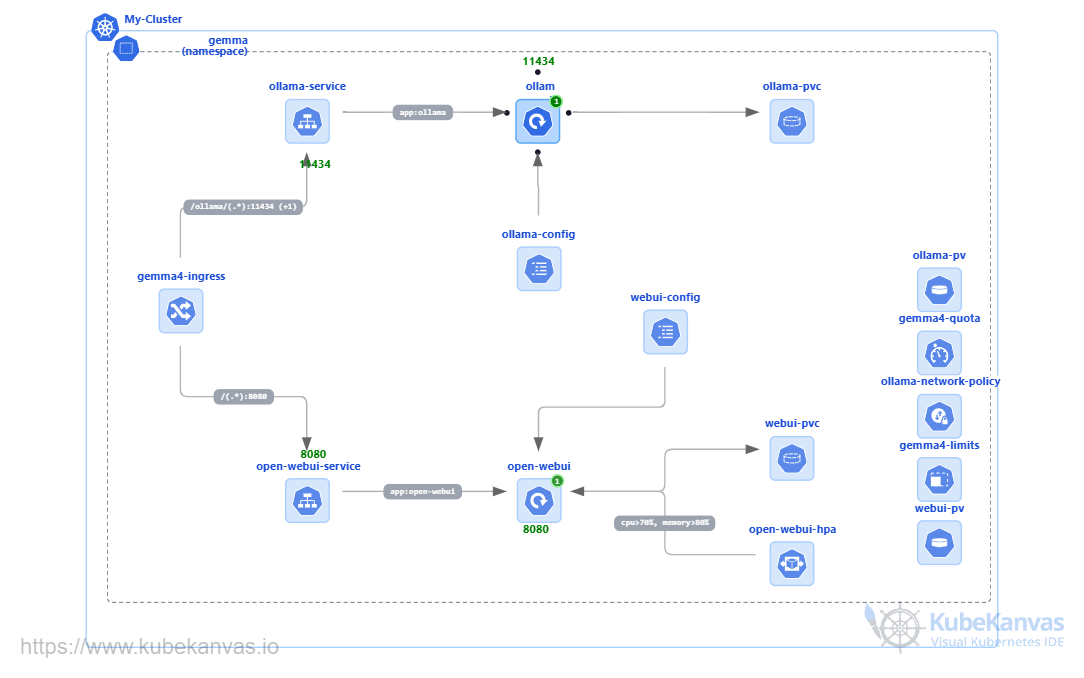
0 usesRunning a local LLM requires a model server, persistent weight storage, and a browser interface behind an ingress. This template deploys Google Gemma 4 via Ollama with Open WebUI on Kubernetes, producing an offline-capable AI stack accessible at a local domain.
## What's Included
| Component | Type | Port | Role |
|---|---|---|---|
| Namespace | Namespace | - | Isolates all resources under `gemma4` |
| ollama-pv | PersistentVolume | - | 30 GB hostPath volume for model weights |
| ollama-pvc | PersistentVolumeClaim | - | Binds Ollama to model storage |
| webui-pv | PersistentVolume | - | 5 GB hostPath volume for WebUI data |
| webui-pvc | PersistentVolumeClaim | - | Binds WebUI to its data storage |
| ollama-config | ConfigMap | - | Ollama runtime env vars |
| webui-config | ConfigMap | - | Open WebUI env vars |
| ollama | Deployment | 11434 | Ollama inference server running Gemma 4 |
| ollama-service | Service (NodePort) | 11434 / 30111 | Exposes Ollama internally and via NodePort |
| open-webui | Deployment | 8080 | Browser chat interface |
| open-webui-service | Service (NodePort) | 8080 / 30080 | Exposes WebUI internally and via NodePort |
| nginx | IngressClass | - | Declares NGINX as default ingress class |
| gemma4-ingress | Ingress | 80 | Routes gemma.local to WebUI, ollama.local to API |
| open-webui-hpa | HorizontalPodAutoscaler | - | Scales WebUI on CPU or memory pressure |
| gemma4-quota | ResourceQuota | - | Caps CPU, memory, and pod count in namespace |
| gemma4-limits | LimitRange | - | Sets per-container resource defaults and ceilings |
| ollama-network-policy | NetworkPolicy | 11434 | Restricts Ollama to WebUI pods and ingress controller |
## Architecture Overview
Ollama runs as a single replica with a 30 GB PersistentVolume for model weights. An init container pulls Gemma 4 on first boot using the Ollama CLI directly. Open WebUI reaches Ollama via internal ClusterIP DNS. NGINX Ingress routes `gemma.local` to the WebUI and `ollama.local` to the raw API, with buffering off for token streaming. A NetworkPolicy restricts Ollama to WebUI pods and the ingress controller only.
## Prerequisites
- Docker Desktop with Kubernetes enabled and WSL2 configured with at least 12 GB memory via `.wslconfig`
- NGINX Ingress Controller deployed in the `ingress-nginx` namespace
- `127.0.0.1 gemma.local ollama.local` added to `C:\Windows\System32\drivers\etc\hosts`
- KubeKanvas CLI installed and running on your computer (Optional, if you want to use one-click deployment)
## How to Deploy
1. Confirm the NGINX Ingress Controller pod is running in `ingress-nginx` before applying.
2. Verify `.wslconfig` sets `memory=12GB` and restart Docker Desktop if you changed it.
3. Update the `hostPath.path` values in both PersistentVolume specs to match your storage path. Kubernetes creates the directories automatically on first mount.
4. Deploy the template to your cluster via the Play button in the top right bar. If you prefer to deploy manually, download the YAML and apply it with `kubectl apply -f gemma4-k8s-final.yaml`.
5. Wait for all pods to reach Running status. You can monitor progress in the Release Monitor screen.
## How to Test
1. Run `kubectl logs -n gemma4 -l app=ollama -c model-puller -f` and confirm `Pull complete` and `Init done` appear before the main container starts.
2. Open `http://gemma.local` and confirm the Open WebUI interface loads.
3. Send a message and confirm Gemma 4 responds with streamed tokens.
4. Hit `http://ollama.local/api/tags` and confirm the JSON response lists `gemma4`.
## Use Cases
- **Offline LLM development:** Test prompts against Gemma 4 with no internet or API token after the initial pull.
- **Private code assistance:** Point Continue.dev or any OpenAI-compatible client at `http://ollama.local` for local inference with no data leaving the machine.
- **Kubernetes learning:** Study a realistic manifest covering PVs, init containers, Ingress, HPA, NetworkPolicy, ResourceQuota, and LimitRange in one deployable file.
- **Air-gapped environments:** Pre-pull weights to the hostPath volume and deploy on a machine with no outbound internet.
- **Multi-user setups:** Enable Open WebUI signup so multiple developers share one inference server with isolated chat history.
## Summary
This template configures a 17-resource Kubernetes stack that runs Gemma 4 via Ollama, exposes it through a streaming-optimized NGINX Ingress, and enforces namespace-level resource and network controls.
GemmaKubernetesKubekanvas+2 more
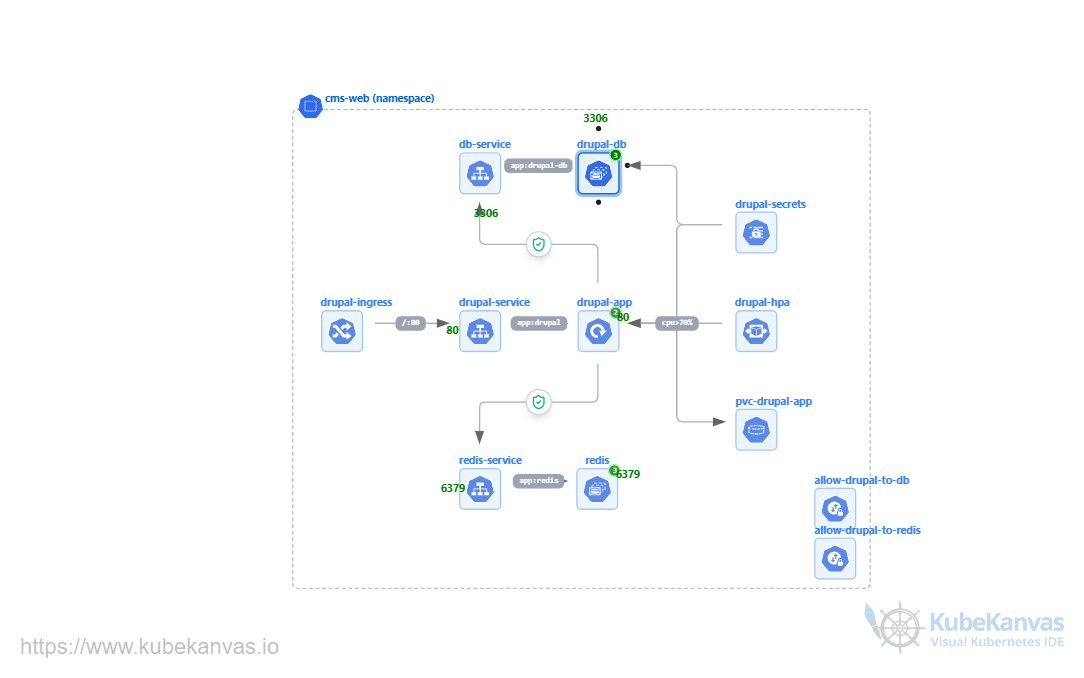
Deploy Drupal + MariaDB + Redis on Kubernetes: Production-Ready CMS
1 useRunning Drupal on Kubernetes requires coordinating a stateful database, a cache layer, and a
web application tier with shared persistent storage. This template deploys Drupal 10 with
MariaDB in a StatefulSet and Redis for page and object caching on any NGINX-ingress-enabled
cluster. The result is a scalable CMS stack with health probes, resource limits, and network
policies configured out of the box.
## What's Included
| Component | Type | Port | Role |
|---|---|---|---|
| drupal-app | Deployment | 80 | Serves Drupal 10 over Apache; mounts shared files PVC |
| drupal-db | StatefulSet | 3306 | MariaDB 10.11; one PVC per replica via volumeClaimTemplates |
| redis | StatefulSet | 6379 | Redis 7 cache layer for Drupal page and object cache |
| drupal-service | Service (ClusterIP) | 80 | Internal service fronting the Drupal Deployment |
| db-service | Service (Headless) | 3306 | Headless service enabling per-pod DNS for MariaDB replicas |
| redis-service | Service (Headless) | 6379 | Headless service enabling per-pod DNS for Redis replicas |
| drupal-ingress | Ingress | 80 | Routes external HTTP traffic to drupal-service via NGINX |
| drupal-hpa | HorizontalPodAutoscaler | - | Scales Drupal pods between 2 and 5 replicas at 70% CPU |
| drupal-secrets | Secret | - | Holds MariaDB root and Drupal user passwords |
| allow-drupal-to-db | NetworkPolicy | - | Restricts MariaDB ingress to Drupal pods only |
| allow-drupal-to-redis | NetworkPolicy | - | Restricts Redis ingress to Drupal pods only |
## Architecture Overview
External HTTP traffic enters through the NGINX Ingress and reaches drupal-service, which
load-balances across Drupal pods. Each pod connects to MariaDB via headless db-service using
per-pod DNS and to Redis via redis-service for caching. All Drupal replicas share a
ReadWriteMany PVC for sites/default/files. NetworkPolicies enforce that only Drupal pods can
reach the database and cache tiers. The HPA scales the Deployment based on CPU utilization.
## Prerequisites
- A running Kubernetes cluster (Docker Desktop, Minikube, or any cluster)
- NGINX Ingress Controller installed on the cluster
- At least 6 GB of node memory allocated created on the node (local clusters only; use cloud CSI PVs in production)
- KubeKanvas CLI installed and running on your computer (if you want to use one-click deployment)
## How to Deploy
1. Update the `db-password` value in `drupal-secrets` to a strong, unique password before deploying.
3. Confirm NGINX Ingress Controller is running. Add a `host:` field to the Ingress rule if serving Drupal on a specific domain.
4. Deploy the template to your cluster via the Play button in the top right bar. If you prefer to deploy manually, download the YAML and apply it with kubectl.
5. Wait for all pods to reach Running status. You can monitor progress in the Release Monitor screen.
## How to Test
1. Run `kubectl get pvc -n cms-web` and confirm all four PVCs show status `Bound`.
2. Open `http://<your-cluster-ip>/` in a browser; the Drupal installation wizard should appear.
3. Run `kubectl exec -n cms-web drupal-db-0 -- mysqladmin ping -u root -p<password>` to confirm MariaDB is healthy.
4. Run `kubectl exec -n cms-web redis-0 -- redis-cli ping` and verify the response is `PONG`.
## Use Cases
- **Multi-replica CMS:** Run Drupal with 2-5 replicas sharing a common files directory via a ReadWriteMany volume.
- **Stateful database on Kubernetes:** Use MariaDB in a StatefulSet with per-pod PVCs for stable network identities and individual disk persistence.
- **Cache-backed Drupal:** Connect Drupal's page and object cache modules to Redis to offload PHP processing on high-read workloads.
- **Network-isolated stack:** Enforce that only application pods reach the database and cache tiers using NetworkPolicy without an external firewall.
- **Autoscaling web tier:** Pair a fixed StatefulSet database with an autoscaling Deployment for variable PHP traffic.
## Summary
This template configures a three-tier Drupal CMS stack with a 3-replica MariaDB StatefulSet,
a 3-replica Redis StatefulSet, and an autoscaling Drupal Deployment, including persistent
storage, health probes, resource limits, NetworkPolicies, and NGINX Ingress routing in the
`cms-web` namespace.
DrupalKubernetesKubekanvas+1 more
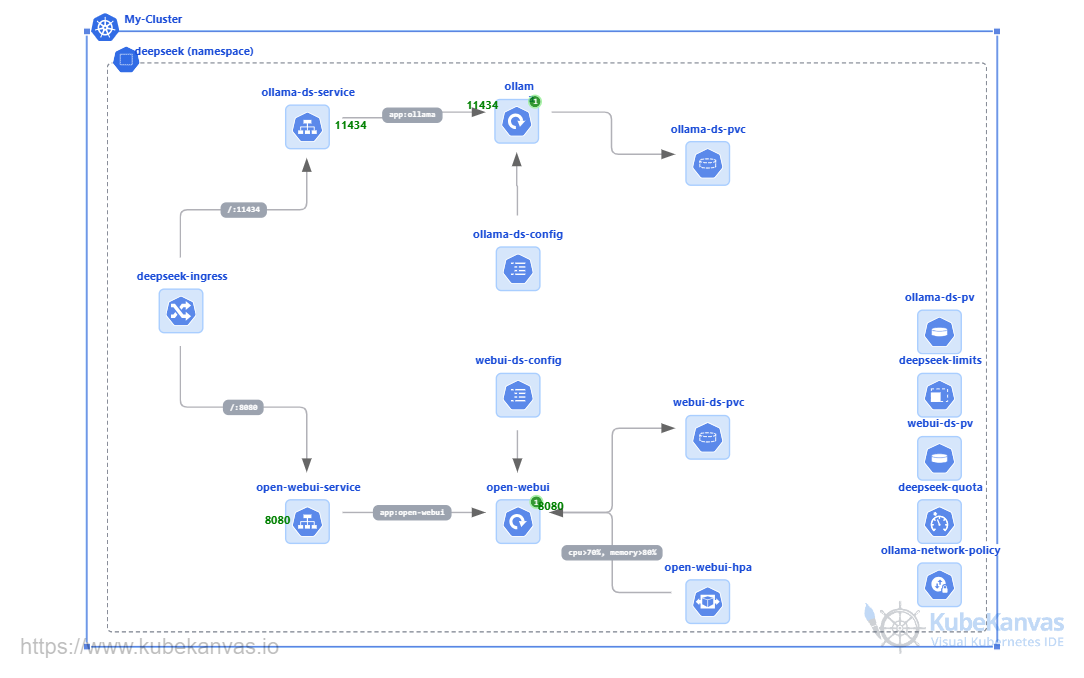
Deploy DeepSeek R2 + Ollama on Kubernetes: Local AI Stack
1 useRunning a local LLM requires a model server, persistent weight storage, and a browser interface behind an ingress. This template deploys DeepSeek R2 via Ollama with Open WebUI on Kubernetes, producing an offline-capable AI stack accessible at a local domain.
## What's Included
| Component | Type | Port | Role |
|---|---|---|---|
| Namespace | Namespace | - | Isolates all resources under `deepseek` |
| ollama-ds-pv | PersistentVolume | - | 30 GB hostPath volume for model weights |
| ollama-ds-pvc | PersistentVolumeClaim | - | Binds Ollama to model storage |
| webui-ds-pv | PersistentVolume | - | 5 GB hostPath volume for WebUI data |
| webui-ds-pvc | PersistentVolumeClaim | - | Binds WebUI to its data storage |
| ollama-ds-config | ConfigMap | - | Ollama runtime env vars |
| webui-ds-config | ConfigMap | - | Open WebUI env vars |
| ollama | Deployment | 11434 | Ollama inference server running DeepSeek R2 |
| ollama-ds-service | Service (NodePort) | 11434 / 30112 | Exposes Ollama internally and via NodePort |
| open-webui | Deployment | 8080 | Browser chat interface |
| open-webui-service | Service (NodePort) | 8080 / 30081 | Exposes WebUI internally and via NodePort |
| nginx | IngressClass | - | Declares NGINX as default ingress class |
| deepseek-ingress | Ingress | 80 | Routes deepseek.local to WebUI, ollama-ds.local to API |
| open-webui-hpa | HorizontalPodAutoscaler | - | Scales WebUI on CPU or memory pressure |
| deepseek-quota | ResourceQuota | - | Caps CPU, memory, and pod count in namespace |
| deepseek-limits | LimitRange | - | Sets per-container resource defaults and ceilings |
| ollama-network-policy | NetworkPolicy | 11434 | Restricts Ollama to WebUI pods and ingress controller |
## Architecture Overview
Ollama runs as a single replica with a 30 GB PersistentVolume for model weights. An init container pulls DeepSeek R2 on first boot using the Ollama CLI directly. Open WebUI reaches Ollama via internal ClusterIP DNS. NGINX Ingress routes `deepseek.local` to the WebUI and `ollama-ds.local` to the raw API, with buffering off for token streaming. A NetworkPolicy restricts Ollama to WebUI pods and the ingress controller only.
## Prerequisites
- Docker Desktop with Kubernetes enabled and WSL2 configured with at least 12 GB memory via `.wslconfig`
- NGINX Ingress Controller deployed in the `ingress-nginx` namespace
- `127.0.0.1 deepseek.local ollama-ds.local` added to `C:\Windows\System32\drivers\etc\hosts`
- KubeKanvas CLI installed and running on your computer (Optional, if you want to use one-click deployment)
## How to Deploy
1. Confirm the NGINX Ingress Controller pod is running in `ingress-nginx` before applying.
2. Verify `.wslconfig` sets `memory=12GB` and restart Docker Desktop if you changed it.
3. Update the `hostPath.path` values in both PersistentVolume specs to match your storage path. Kubernetes creates the directories automatically on first mount.
4. Deploy the template to your cluster via the Play button in the top right bar. If you prefer to deploy manually, download the YAML and apply it with `kubectl apply -f deepseek-k8s-final.yaml`.
5. Wait for all pods to reach Running status. You can monitor progress in the Release Monitor screen.
## How to Test
1. Run `kubectl logs -n deepseek -l app=ollama -c model-puller -f` and confirm `Pull complete` and `Init done` appear before the main container starts.
2. Open `http://deepseek.local` and confirm the Open WebUI interface loads.
3. Send a message and confirm DeepSeek R2 responds with streamed tokens.
4. Hit `http://ollama-ds.local/api/tags` and confirm the JSON response lists `deepseek-r2`.
## Use Cases
- **Offline LLM development:** Test prompts against DeepSeek R2 with no internet or API token after the initial pull.
- **Private code assistance:** Point Continue.dev or any OpenAI-compatible client at `http://ollama-ds.local` for local inference with no data leaving the machine.
- **Kubernetes learning:** Study a realistic manifest covering PVs, init containers, Ingress, HPA, NetworkPolicy, ResourceQuota, and LimitRange in one deployable file.
- **Air-gapped environments:** Pre-pull weights to the hostPath volume and deploy on a machine with no outbound internet.
- **Multi-user setups:** Enable Open WebUI signup so multiple developers share one inference server with isolated chat history.
## Summary
This template configures a 17-resource Kubernetes stack that runs DeepSeek R2 via Ollama, exposes it through a streaming-optimized NGINX Ingress, and enforces namespace-level resource and network controls.
DeepSeekkuberneteskubekanvas+2 more
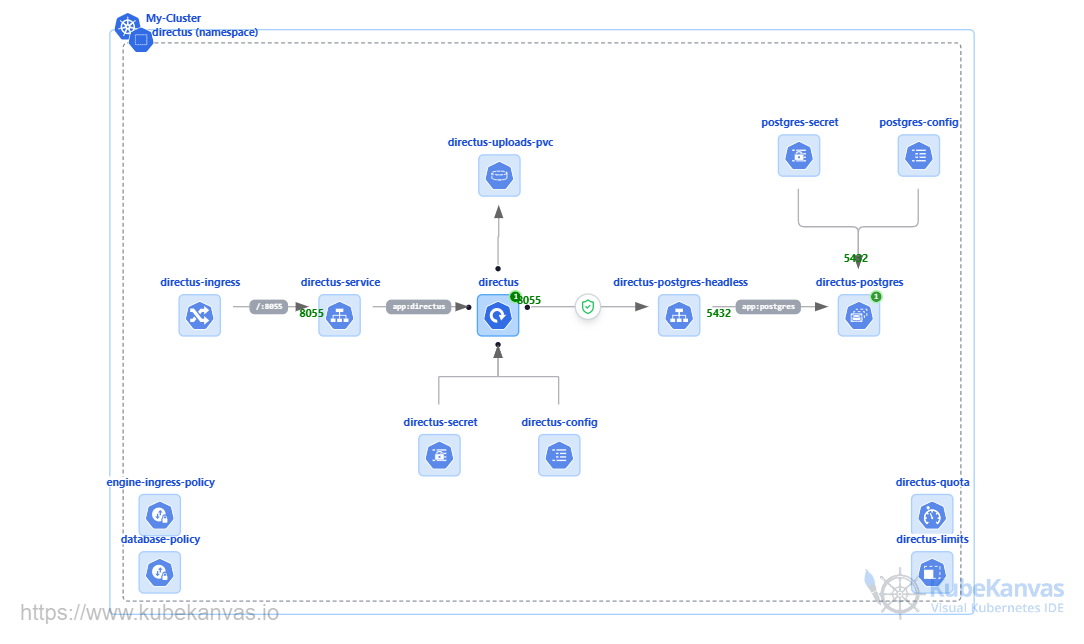
Deploy Directus CMS on Kubernetes with PostgreSQL: Production-Ready Template
1 useRunning Directus in production requires coordinating a stateful database, persistent file storage, and network isolation. This template deploys Directus 11 backed by PostgreSQL 16 on Kubernetes, producing a namespace-isolated setup with ingress routing, resource quotas, and pod-level network policies.
## What's Included
| Component | Type | Port | Role |
|---|---|---|---|
| directus | Deployment | 8055 | Runs the Directus CMS application |
| directus-postgres | StatefulSet | 5432 | Runs PostgreSQL 16 as the primary database |
| directus-postgres-headless | Service (Headless) | 5432 | Stable DNS for the StatefulSet |
| directus-service | Service (ClusterIP) | 8055 | Exposes Directus internally |
| directus-ingress | Ingress | 8055 | Routes external HTTP traffic to Directus |
| directus-config | ConfigMap | - | Non-sensitive Directus environment variables |
| postgres-config | ConfigMap | - | Non-sensitive PostgreSQL environment variables |
| directus-secret | Secret | - | DB password, admin credentials, cookie secret |
| postgres-secret | Secret | - | PostgreSQL superuser password |
| directus-uploads-pvc | PVC | - | Persists uploaded files across pod restarts |
| pg-storage | PVC | - | Persists PostgreSQL data |
| directus-quota | ResourceQuota | - | Namespace-level CPU and memory ceilings |
| directus-limits | LimitRange | - | Default resource requests per container |
| database-policy | NetworkPolicy | - | Restricts DB ingress to Directus pods only |
| engine-ingress-policy | NetworkPolicy | - | Restricts Directus ingress to port 8055 |
## Architecture Overview
Directus connects to PostgreSQL through the headless service DNS (`directus-postgres-headless`). The nginx Ingress routes traffic on `directus.local` to the ClusterIP service on port 8055. NetworkPolicies enforce isolation: PostgreSQL only accepts connections from `app: directus` pods, and Directus only accepts inbound traffic on port 8055. File uploads are decoupled from the application pod via a dedicated PVC.
## Prerequisites
- A running Kubernetes cluster (Docker Desktop or Minikube recommended)
- NGINX Ingress Controller installed in your cluster
- `hostpath` StorageClass available (default on Docker Desktop and Minikube)
- `directus.local` added to `/etc/hosts` pointing to `127.0.0.1`
- KubeKanvas CLI installed and running on your computer (Optional, if you want to use one-click deployment)
## How to Deploy
1. Open the Secrets and replace all placeholders: set `DB_PASSWORD` and `POSTGRES_PASSWORD` to the same strong password, set `SECRET` to a random 32-character string, and update `ADMIN_EMAIL` and `ADMIN_PASSWORD`.
2. Confirm `DB_HOST` is `directus-postgres-headless` and `DB_DATABASE` matches `POSTGRES_DB` across both ConfigMaps.
3. Adjust `ResourceQuota` and `LimitRange` values to match your cluster capacity.
4. Deploy the template to your cluster via the Play button in the top right bar. If you prefer to deploy manually, download the YAML and apply it with kubectl.
5. Wait for all pods to reach Running status. You can monitor progress in the Release Monitor screen.
## How to Test
1. Run `kubectl get pods -n directus` and confirm both pods show `Running` with all containers ready.
2. Open `http://directus.local` and sign in with the admin credentials from your Secret.
3. Run `curl http://directus.local/server/ping` and confirm it returns `pong`.
4. Upload a file via the admin UI, delete and recreate the Directus pod, and confirm the file persists.
## Use Cases
- **Local CMS development:** Run the full stack on Docker Desktop to develop API-driven frontends without a remote environment.
- **Upgrade testing:** The StatefulSet and volumeClaimTemplate let you test Directus version upgrades against a persistent database without data loss.
- **Resource-constrained clusters:** ResourceQuota and LimitRange make this suitable for shared clusters with namespace-level ceilings.
- **File-heavy content workflows:** The decoupled uploads PVC handles large media libraries independently of the application pod lifecycle.
## Summary
This template configures a namespace-isolated Directus CMS deployment with a StatefulSet-backed PostgreSQL database, persistent storage for data and uploads, ingress routing, resource governance, and network-level access control.
DirectusKuberneteskubekanvas+2 more
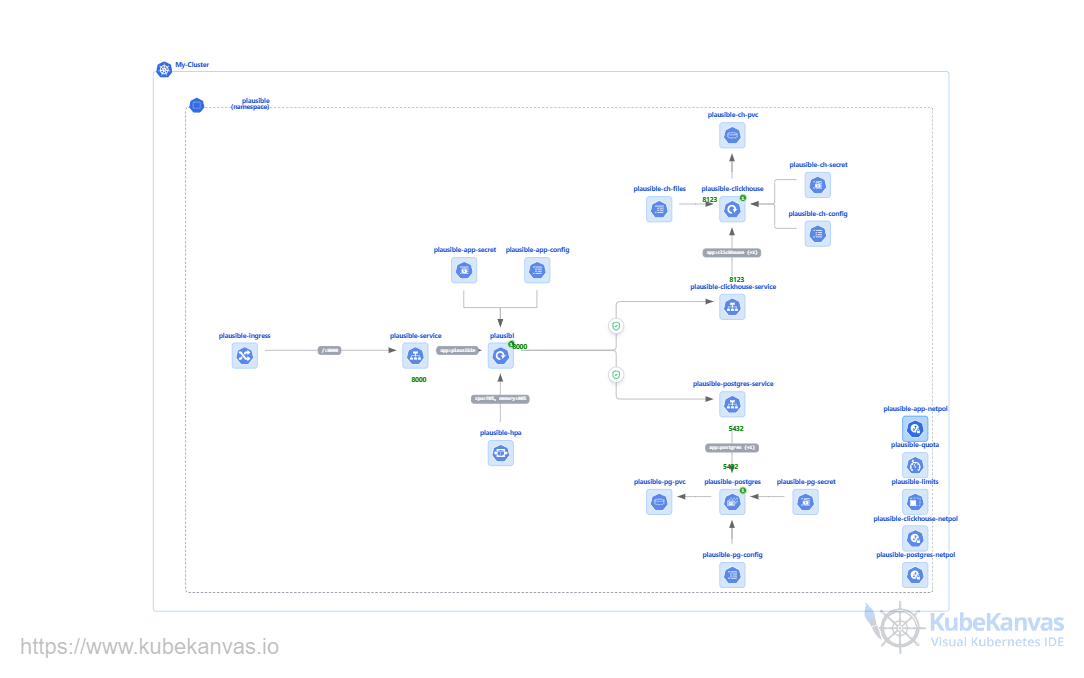
Deploy Plausible Analytics on Kubernetes: Self-Hosted Stack
1 useSelf-hosting website analytics often requires complex orchestration of separate transactional and analytical databases. This configuration deploys Plausible CE on Kubernetes with PostgreSQL for operational data and ClickHouse for analytics events, producing a GDPR-compliant, cookie-free analytics stack accessible at a local domain.
### What's Included
| Component | Type | Port | Role |
| --- | --- | --- | --- |
| `plausible` | Namespace | - | Isolates all resources under plausible |
| `plausible-pg-pvc` | PersistentVolumeClaim | - | 10 GB for PostgreSQL data |
| `plausible-ch-pvc` | PersistentVolumeClaim | - | 20 GB for ClickHouse events |
| `plausible-pg-config` | ConfigMap | - | PostgreSQL env vars |
| `plausible-pg-secret` | Secret | - | PostgreSQL password |
| `plausible-ch-config` | ConfigMap | - | ClickHouse env vars |
| `plausible-ch-secret` | Secret | - | ClickHouse password |
| `plausible-ch-files` | ConfigMap | - | config.xml and users.xml as mounted files |
| `plausible-app-config` | ConfigMap | - | Plausible env vars (BASE_URL, DB URLs) |
| `plausible-app-secret` | Secret | - | SECRET_KEY_BASE |
| `plausible-postgres` | StatefulSet | 5432 | PostgreSQL 16: OLTP store for users and config |
| `plausible-postgres-service` | Service (ClusterIP) | 5432 | Internal DNS only |
| `plausible-clickhouse` | Deployment | 8123/9000 | ClickHouse: OLAP store for events |
| `plausible-clickhouse-service` | Service (ClusterIP) | 8123/9000 | Internal DNS only |
| `plausible` | Deployment | 8000 | App server with 3 init containers |
| `plausible-service` | Service (ClusterIP) | 8000 | Internal: Ingress routes here |
| `nginx` | IngressClass | - | Declares NGINX as default ingress class |
| `plausible-ingress` | Ingress | 80 | Routes plausible.local to app service |
| `plausible-hpa` | HorizontalPodAutoscaler | - | Scales Plausible pods from 1 to 3 replicas |
| `plausible-quota` | ResourceQuota | - | Namespace resource cap |
| `plausible-limits` | LimitRange | - | Per-container defaults |
| `plausible-postgres-netpol` | NetworkPolicy | 5432 | PostgreSQL: Plausible pods only |
| `plausible-clickhouse-netpol` | NetworkPolicy | 8123/9000 | ClickHouse: Plausible pods only |
| `plausible-app-netpol` | NetworkPolicy | 8000 | Plausible: NGINX ingress only |
### Architecture Overview
PostgreSQL stores users, sites, and goals, while ClickHouse stores every pageview for fast aggregation. The Plausible pod is the only component that talks to both databases, a constraint enforced by NetworkPolicies. Three sequential init containers ensure both databases are ready and migrations complete before the main application starts. NGINX Ingress forwards real client IPs for accurate geo data parsing.
### Prerequisites
* NGINX Ingress Controller deployed in the ingress-nginx namespace
* 6 GB RAM available to the cluster node
* 127.0.0.1 plausible.local added to your hosts file
* KubeKanvas CLI installed and running on your computer (Optional, if you want to use one-click deployment)
### How to Deploy
1. Confirm the NGINX Ingress Controller is running in the ingress-nginx namespace.
2. Generate a SECRET_KEY_BASE value using `openssl rand -hex 64`, base64-encode it, and replace the placeholder in the plausible-app-secret manifest.
3. Update the storage paths in both PVCs to match your operating system filesystem structure.
4. Deploy the template to your cluster via the Play button in the top right bar. If you prefer to deploy manually, download the YAML and apply it with kubectl.
5. Wait for all pods to reach Running status. You can monitor progress in the Release Monitor screen.
### How to Test
1. Run `kubectl get pods -n plausible` and confirm all three pods show a status of Running.
2. Open `http://plausible.local` in your browser and confirm the Plausible admin setup screen loads.
3. Create your admin account, add a test site, and confirm the analytics dashboard renders.
4. Execute an HTTP GET request against `http://plausible.local/api/health` and confirm the JSON response shows healthy.
### Use Cases
* **Privacy-first analytics:** Replace Google Analytics with a cookie-free, GDPR-compliant alternative where all data stays on your own infrastructure.
* **Air-gapped deployments:** Run an analytics platform that requires no external internet access to record or display traffic data once deployed.
* **Multi-site tracking:** Aggregating multiple tracking scripts into one instance using isolated dashboards and goals.
* **High-volume event storage:** Scale from a personal blog to a high-traffic site using ClickHouse as an analytical data store without changing the architecture.
### Summary
This template configures a 24-resource Kubernetes stack running Plausible CE with PostgreSQL for operational data and ClickHouse for analytics events, exposed via NGINX Ingress with per-component ConfigMap, Secret, and NetworkPolicy isolation.
Plausiblekuberneteskubekanvas+3 more

Deploy ClickHouse on Kubernetes: Production Analytical Database
0 uses
Deploying an analytical data warehouse requires strict compute limit enforcement, decoupled cluster scaling, and isolated network control planes. This template configures a production-ready standalone ClickHouse server on cloud and on-premises environments using native resource controls and fine-grained authentication profiles.
# What's Included
| Component | Type | Port | Role |
| --- | --- | --- | --- |
| clickhouse-namespace | Namespace | None | Isolates the ClickHouse database resources from the rest of the cluster |
| clickhouse-data-pvc | PersistentVolumeClaim | None | Allocates 50Gi of hostpath storage for database files and data blocks |
| clickhouse-config | ConfigMap | None | Configures environment variables for the database name, admin user, and access management |
| clickhouse-secret | Secret | None | Stores the clickhouse_pass administrative password securely |
| clickhouse-files | ConfigMap | None | Injects custom config.xml and users.xml configurations into the container |
| clickhouse | StatefulSet | 8123, 9000 | Deploys a single-replica server running clickhouse/clickhouse-server:26.5 with custom configuration mounts |
| clickhouse-service | Service | 8123, 9000 | Exposes the database pods internally to the cluster network via a static ClusterIP |
| clickhouse-ingress | Ingress | 80 | Routes external traffic to the ClickHouse HTTP endpoint via nginx with CORS allowed |
| clickhouse-hpa | HorizontalPodAutoscaler | None | Triggers horizontal scale behaviors targeting 70 percent CPU and 80 percent memory thresholds |
| clickhouse-quota | ResourceQuota | None | Imposes hard operational namespace thresholds limiting overall cluster CPU, memory, and pod counts |
| clickhouse-limits | LimitRange | None | Enforces mandatory minimum and maximum compute boundary defaults on individual data containers |
| clickhouse-netpol | Network Policy | None | Imposes strict isolation rules restricting database ingress exclusively to tabix pods and nginx ingress controllers |
# Architecture Overview
External HTTP traffic passes through NGINX Ingress on port 80 to the internal cluster service, where a dedicated network policy isolates port 8123 and port 9000 interaction strictly to authorized controllers and tabix pods. The StatefulSet manages a single data instance mounted to persistent hostpath volume storage with root operational security enforced via a custom file system group id. Multi-layered protection layers apply hard hardware caps across the namespace through strict resource quotas and compute limit ranges
# Prerequisites
* NGINX Ingress Controller deployed and configured to recognize the nginx ingress class
* Distributed hosts file or external DNS entry pointing `clickhouse.local` to your specific cloud load balancer or local gateway IP
* Default storage class setup capable of dynamically provisioning read-write-once persistent storage volumes
* KubeKanvas CLI installed and running on your computer (Optional, if you want to use one-click deployment)
# How to Deploy
1. Modify the persistent volume claim storage class to match cloud block devices like aws-ebs-csi or azure-disk-csi when targeting managed public cloud infrastructure.
2. Adjust the base configuration maps and secrets to establish unique database names and root system passwords.
3. Review the namespace resource quotas to confirm your target cluster nodes hold sufficient unallocated capacity for the database boundaries.
4. Deploy the template to your cluster via the Play button in the top right bar. If you prefer to deploy manually, download the YAML and apply it with kubectl.
5. Wait for all pods to reach Running status. You can monitor progress in the Release Monitor screen.
# How to Test
1. Transmit an HTTP GET request directed at `http://clickhouse.local/ping` using curl or an external web browser to ensure the application startup and readiness probes evaluate successfully.
2. Establish a remote TCP link over native database port 9000 using a management utility to confirm internal cluster networking pathways bypass the security policy.
3. Authenticate against the analytics database catalog using client username credentials to check that custom global system configurations prevent access from unauthorized source networks.
# Use Cases
* **Bounded Resource Multi-Tenancy:** Isolation of massive column-oriented analytics engines inside multi-tenant environments using explicit resource quotas and execution safety metrics.
* **Autoscaled Query Processing Pipelines:** Running heavy real-time data analytics pipelines that automatically scale up compute instances when heavy visualization tasks stress cluster resources.
# Summary
This template builds a highly standardized, security-hardened ClickHouse installation featuring automatic horizontal pod autoscaling, rigid compute resource boundaries, isolated network access configurations, and cloud-ready data persistence.
ClickHouseKubeKanvasKubernetes+1 more
Deploy Prometheus + Grafana on Kubernetes: Namespace Isolated Stack
1 useManaging cluster-wide monitoring requires extensive administrative permissions that introduce security risks in multi-tenant environments. Engineers deploy Prometheus on Kubernetes within a single namespace to isolate metric collection and lock down RBAC access rules. This namespace isolated Prometheus stack establishes a secure, localized monitoring loop using a lightweight Prometheus Kubernetes template.
### What's Included
| Component | Type | Port | Role |
| --- | --- | --- | --- |
| Prometheus Server | Deployment & Service | 9090 | Pulls, stores, and exposes PromQL metrics |
| Grafana | Deployment & Service | 3000 | Provides visual dashboards and identity management |
| Alertmanager | Deployment & Service | 9093 | Deduplicates and routes triggered alert definitions |
| Node Exporter | DaemonSet & Service | 9100 | Collects underlying host hardware operating metrics |
| Kube-State-Metrics | Deployment & Service | 8080 | Generates localized metrics about object states |
| Grafana Ingress | Ingress | 80 | Routes external HTTP requests to the Grafana service |
| Prometheus Local Role | Role & RoleBinding | None | Restricts service account operations to the local namespace |
### Architecture Overview
The architecture confines all data flow within a single namespace. The Prometheus data retrieval worker pulls metrics from Node Exporter, Kube-State-Metrics, and local pods. Scraped data populates an internal time series database. An NGINX Ingress routes external client traffic strictly to the Grafana pod. Grafana queries the local Prometheus server internally via Kubernetes DNS services. Localized Role and RoleBinding objects enforce strict namespace isolation boundaries.
### Prerequisites
* Configure an active target namespace on your Kubernetes cluster.
* Install an NGINX Ingress Controller to manage external routing rules.
* Map your local hosts file to resolve the target domain name on your computer.
* KubeKanvas CLI installed and running on your computer (Optional, if you want to use one-click deployment)
### How to Deploy
1. Download the complete stack configuration package.
2. Configure your custom environmental variables inside the provided manifest files.
3. Deploy the template to your cluster via the Play button in the top right bar. If you prefer to deploy manually, download the YAML and apply it with kubectl.
4. Wait for all pods to reach Running status. You can monitor progress in the Release Monitor screen.
### How to Test
1. Open your local web browser and navigate to the configured Grafana ingress address.
2. Log in using the default admin credentials to confirm frontend functionality.
3. Execute a PromQL query inside the Grafana Explore interface to verify that metrics propagate from the local database.
### Use Cases
* **Multi-Tenant Clusters:** Development teams require standalone monitoring inside their dedicated namespaces without cluster-wide RBAC visibility.
* **Strict Compliance Environments:** Security policies forbid the creation of ClusterRoles or ClusterRoleBindings for application monitoring tools.
### Summary
This template configures a localized monitoring stack consisting of Prometheus, Grafana, Alertmanager, and resource exporters bound within a namespace sandbox. The deployment enforces strict security parameters by utilizing namespaced RBAC configurations and restricted ingress rules.
PrometheusGrafanaKubernetes+2 more
Deploy n8n on Kubernetes: Production-Ready Automation Stack
0 usesDeploy n8n in a production-ready, non-queue setup with dedicated backend services to handle automated workflows on your cluster. This template configures the core application, a persistent PostgreSQL instance, and an ephemeral Redis instance, fulfilling search requirements for users looking to deploy n8n on Kubernetes, find an n8n Kubernetes template, or configure an n8n Kubernetes deployment.
### What's Included
| Component | Type | Port | Role |
| --- | --- | --- | --- |
| Namespace | Namespace | None | Sets up isolated environment for the stack |
| n8n-pg-pvc | PVC | None | Reserves 10 GB of disk space for PostgreSQL |
| n8n-pg-config | ConfigMap | None | Stores non-sensitive database environment variables |
| n8n-pg-secret | Secret | None | Secures the administrator password for PostgreSQL |
| n8n-redis-config | ConfigMap | None | Stores network connection strings for Redis |
| n8n-app-config | ConfigMap | None | Stores app variables including database and webhook URLs |
| n8n-app-secret | Secret | None | Enforces security for the N8N_ENCRYPTION_KEY string |
| postgres | StatefulSet | 5432 | Deploys a stable postgres:16 instance for storage |
| postgres-service | Service | 5432 | Exposes the PostgreSQL database internally to n8n |
| redis | Deployment | 6379 | Runs an ephemeral redis:7-alpine container for cache |
| redis-service | Service | 6379 | Provides internal network access to the Redis instance |
| n8n | Deployment | 5678 | Runs the main n8n container with init checks |
| n8n-service | Service | 5678 | Routes cluster-internal traffic to the n8n workload |
| IngressClass | IngressClass | None | Defines the global cluster-scoped NGINX controller |
| n8n-ingress | Ingress | 5678 | Exposes n8n externally over HTTP via n8n.local |
| n8n-hpa | HPA | None | Monitors resources and locks the process to 1 replica |
| n8n-quota | ResourceQuota | None | Caps computing resource consumption for the namespace |
| n8n-limits | LimitRange | None | Declares container-level request and limit boundaries |
| postgres-netpol | NetworkPolicy | 5432 | Restricts PostgreSQL traffic to n8n pods only |
| redis-netpol | NetworkPolicy | 6379 | Restricts Redis traffic to n8n pods only |
| n8n-netpol | NetworkPolicy | 5678 | Isolates n8n to allow traffic only from ingress-nginx |
### Architecture Overview
The Ingress resource routes external traffic through the local hostname to the n8n Service. The n8n Deployment utilizes twin init containers to poll network readiness on the internal PostgreSQL and Redis services before booting the primary application process. The single-replica limitation prevents scheduling conflicts, while the PostgreSQL database utilizes stable stateful pod identities alongside persistent disk volumes to preserve operational workflow data across pod recycles. Network policies isolate the entire database and caching layers, permitting traffic strictly from verified application workloads.
### Prerequisites
* Local or cloud-managed Kubernetes cluster
* NGINX Ingress Controller configured on your cluster
* CoreDNS or internal DNS routing capabilities operational
* Persistent volume provisioner for the database storage claim
* KubeKanvas CLI installed and running on your computer (Optional, if you want to use one-click deployment)
### How to Deploy
1. Configure the `N8N_ENCRYPTION_KEY` inside the `n8n-app-secret` file to ensure database credential safety.
2. Edit the `WEBHOOK_URL` entry within the `n8n-app-config` map to map precisely with your targeted external domain name.
3. Apply the global configuration resources and namespace parameters to establish the administrative network boundaries.
4. Deploy the template to your cluster via the Play button in the top right bar via **kubekanvas** or If you prefer to deploy manually, download the YAML and apply it with kubectl.
5. Wait for all pods to reach Running status. You can monitor progress in the Release Monitor screen.
### How to Test
1. Click the release monitor button at kubekanvas or run `kubectl get pods -n n8n` to verify that the PostgreSQL init containers completed and the main n8n instance is running.
2. Direct a local browser or HTTP client to `http://n8n.local` to load the initial setup and login dashboard.
3. Create a temporary HTTP Webhook node inside the interface and confirm the generated endpoint resolves against the set environment variables.
### Use Cases
* **Single Instance Automation Engines:** Hosting self-contained, high-performance visual automation environments without the overhead of heavy scaling architecture.
* **Secured Self-Hosted Deployments:** Restricting workflow tools and proprietary corporate automation secrets behind closed, policy-governed network paths.
### Summary
This template provisions a non-queue, production-grade n8n automation stack backed by a persistent PostgreSQL StatefulSet and a volatile Redis caching layer.