Do you want to try the Wordpress setup present in this article in your local cluster without manually copy pasting any yaml? Start by creating your project using our Wordpress template.
Do you want to try the Wordpress setup present in this article in your local cluster without manually copy pasting any yaml? Start by creating your project using our Wordpress template.
High-Availability WordPress Deployment on Kubernetes
Building a scalable, resilient WordPress platform with MySQL in Kubernetes using production-ready configurations and best practices for mid-level developers.
Introduction
WordPress powers over 40% of all websites on the internet, making it one of the most popular content management systems. When deploying WordPress at scale, you need high availability, automatic scaling, and robust data persistence. Kubernetes provides the perfect platform for achieving these goals.
This guide will walk you through deploying a production-ready, high-availability WordPress setup on Kubernetes.
Prerequisites
Before we begin, ensure you have:
Kubernetes cluster (v1.20+) with at least 3 worker nodes
kubectl configured to access your cluster
Ingress controller (NGINX recommended)
StorageClass configured for dynamic volume provisioning
Basic understanding of Kubernetes concepts (Pods, Services, Deployments)
Verify your setup:
# Check cluster status
kubectl cluster-info

# Verify nodes are ready
kubectl get nodes

# Check storage classes
kubectl get storageclass

# Verify ingress controller
kubectl get pods -n ingress-nginx
# mysql-statefulset.yamlapiVersion:apps/v1kind:StatefulSetmetadata:name:mysqllabels:app:mysqlspec:serviceName:mysql-headlessreplicas:1selector:matchLabels:app:mysqltemplate:metadata:labels:app:mysqlspec:containers:-name:mysqlimage:mysql:8.0envFrom:-configMapRef:name:mysql-config-secretRef:name:mysql-secretports:-containerPort:3306name:mysqlvolumeMounts:-name:mysql-datamountPath:/var/lib/mysql-name:mysql-config-volumemountPath:/etc/mysql/conf.dresources:requests:memory:512Micpu:250mlimits:memory:1Gicpu:500mlivenessProbe:exec:command:-mysqladmin-ping--h-localhostinitialDelaySeconds:30periodSeconds:10timeoutSeconds:5volumes:-name:mysql-config-volumeconfigMap:name:mysql-configvolumeClaimTemplates:-metadata:name:mysql-dataspec:accessModes: ["ReadWriteOnce"]
resources:requests:storage:20GistorageClassName:standard# Replace with your storage class---
# MySQL Headless Service (required for StatefulSet)apiVersion:v1kind:Servicemetadata:name:mysql-headlesslabels:app:mysqlspec:clusterIP:Noneselector:app:mysqlports:-port:3306targetPort:3306---
# MySQL ClusterIP Service (for application access)apiVersion:v1kind:Servicemetadata:name:mysqllabels:app:mysqlspec:type:ClusterIPselector:app:mysqlports:-port:3306targetPort:3306protocol:TCP
1.3: Deploy MySQL
# Apply MySQL configuration
kubectl apply -f mysql-config.yaml
kubectl apply -f mysql-statefulset.yaml

# Verify MySQL deployment
kubectl get statefulset mysql
kubectl get pods -l app=mysql
kubectl get pvc -l app=mysql

# Check MySQL logs
kubectl logs mysql-0

# Test MySQL connectivity
kubectl exec -it mysql-0 -- mysql -u root -p -e "SHOW DATABASES;"
Step 2: Deploy WordPress Application
Now we'll deploy WordPress with high availability and proper configuration.
# wordpress-deployment.yamlapiVersion:apps/v1kind:Deploymentmetadata:name:wordpresslabels:app:wordpressspec:replicas:3# High availability with 3 replicasstrategy:type:RollingUpdaterollingUpdate:maxSurge:1maxUnavailable:1selector:matchLabels:app:wordpresstemplate:metadata:labels:app:wordpressspec:containers:-name:wordpressimage:wordpress:6.3-php8.1-apacheenvFrom:-configMapRef:name:wordpress-config-secretRef:name:wordpress-secretports:-containerPort:80name:httpvolumeMounts:-name:wordpress-datamountPath:/var/www/htmlresources:requests:memory:"256Mi"cpu:"250m"limits:memory:"512Mi"cpu:"500m"# Health checkslivenessProbe:httpGet:path:/wp-admin/install.phpport:80initialDelaySeconds:120periodSeconds:30timeoutSeconds:10failureThreshold:3readinessProbe:httpGet:path:/wp-admin/install.phpport:80initialDelaySeconds:30periodSeconds:10timeoutSeconds:5failureThreshold:2# Security contextsecurityContext:runAsNonRoot:falserunAsUser:33# www-data userallowPrivilegeEscalation:falsevolumes:-name:wordpress-datapersistentVolumeClaim:claimName:wordpress-pvc---
# WordPress PVC for shared file storageapiVersion:v1kind:PersistentVolumeClaimmetadata:name:wordpress-pvclabels:app:wordpressspec:accessModes:-ReadWriteMany# Shared across multiple podsresources:requests:storage:10GistorageClassName:standard# Replace with your storage class---
# WordPress ServiceapiVersion:v1kind:Servicemetadata:name:wordpresslabels:app:wordpressspec:type:ClusterIPselector:app:wordpressports:-port:80targetPort:80protocol:TCPname:httpsessionAffinity:ClientIP# For session persistence
2.3: Deploy WordPress
# Apply WordPress configuration
kubectl apply -f wordpress-config.yaml
kubectl apply -f wordpress-deployment.yaml

# Verify WordPress deployment
kubectl get deployment wordpress
kubectl get pods -l app=wordpress
kubectl get pvc wordpress-pvc

# Check WordPress logs
kubectl logs -l app=wordpress

# Test WordPress service
kubectl port-forward svc/wordpress 8080:80
# Open browser to http://localhost:8080
Step 3: Configure Ingress and Load Balancing
Set up external access with SSL termination and load balancing.
# ssl-issuer.yamlapiVersion:cert-manager.io/v1kind:ClusterIssuermetadata:name:letsencrypt-prodspec:acme:server:https://acme-v02.api.letsencrypt.org/directoryemail:[email protected]# Replace with your emailprivateKeySecretRef:name:letsencrypt-prod-keysolvers:-http01:ingress:class:nginx
3.3: Create Ingress Configuration
# wordpress-ingress.yamlapiVersion:networking.k8s.io/v1kind:Ingressmetadata:name:wordpress-ingressannotations:kubernetes.io/ingress.class:nginxcert-manager.io/cluster-issuer:letsencrypt-prodnginx.ingress.kubernetes.io/proxy-body-size:"50m"nginx.ingress.kubernetes.io/proxy-read-timeout:"300"nginx.ingress.kubernetes.io/proxy-connect-timeout:"300"# Rate limitingnginx.ingress.kubernetes.io/rate-limit:"100"nginx.ingress.kubernetes.io/rate-limit-window:"1m"spec:tls:-hosts:-your-wordpress.com# Replace with your domainsecretName:wordpress-tlsrules:-host:your-wordpress.com# Replace with your domainhttp:paths:-path:/pathType:Prefixbackend:service:name:wordpressport:number:80
3.4: Deploy Ingress
# Apply SSL issuer and Ingress
kubectl apply -f ssl-issuer.yaml
kubectl apply -f wordpress-ingress.yaml

# Check certificate status
kubectl get certificate
kubectl describe certificate wordpress-tls

# Verify Ingress
kubectl get ingress
kubectl describe ingress wordpress-ingress
Step 4: Implement Auto-scaling
Configure Horizontal Pod Autoscaler for handling traffic spikes.
# wordpress-alerts.yamlapiVersion:monitoring.coreos.com/v1kind:PrometheusRulemetadata:name:wordpress-alertslabels:app:wordpressspec:groups:-name:wordpressrules:-alert:WordPressDownexpr:up{job="wordpress"}==0for:1mlabels:severity:criticalannotations:summary:"WordPress is down"description:"WordPress has been down for more than 1 minute"-alert:WordPressHighCPUexpr:rate(container_cpu_usage_seconds_total{pod=~"wordpress-.*"}[5m])>0.8for:5mlabels:severity:warningannotations:summary:"High CPU usage on WordPress pods"description:"WordPress CPU usage is above 80% for more than 5 minutes"-alert:WordPressHighMemoryexpr:container_memory_usage_bytes{pod=~"wordpress-.*"}/container_spec_memory_limit_bytes>0.9for:5mlabels:severity:warningannotations:summary:"High memory usage on WordPress pods"description:"WordPress memory usage is above 90% for more than 5 minutes"
Step 6: Backup and Recovery
Implement automated backup strategies for both database and WordPress files.
6.1: Create Database Backup CronJob
# mysql-backup.yamlapiVersion:v1kind:PersistentVolumeClaimmetadata:name:backup-pvclabels:app:backupspec:accessModes:-ReadWriteOnceresources:requests:storage:50GistorageClassName:standard---
apiVersion:batch/v1kind:CronJobmetadata:name:mysql-backuplabels:app:mysql-backupspec:schedule:"0 2 * * *"# Daily at 2 AMjobTemplate:spec:template:metadata:labels:app:mysql-backupspec:containers:-name:mysql-backupimage:mysql:8.0env:-name:MYSQL_ROOT_PASSWORDvalueFrom:secretKeyRef:name:mysql-secretkey:MYSQL_ROOT_PASSWORDcommand:-/bin/bash--c-|
set -e
BACKUP_FILE="/backup/mysql-backup-$(date +%Y%m%d-%H%M%S).sql"
echo "Starting MySQL backup to $BACKUP_FILE"
mysqldump-hmysql-uroot-p$MYSQL_ROOT_PASSWORD\--single-transaction\--routines\--triggers\--all-databases>$BACKUP_FILEecho"Backup completed successfully"gzip$BACKUP_FILEecho"Backup compressed"# Keep only last 7 days of backupsfind/backup-name"mysql-backup-*.sql.gz"-mtime+7-deleteecho"Old backups cleaned up"# List current backupsls-la/backup/volumeMounts:-name:backup-storagemountPath:/backupresources:requests:memory:"256Mi"cpu:"250m"limits:memory:"512Mi"cpu:"500m"volumes:-name:backup-storagepersistentVolumeClaim:claimName:backup-pvcrestartPolicy:OnFailure
6.2: WordPress Files Backup
# wordpress-backup.yamlapiVersion:batch/v1kind:CronJobmetadata:name:wordpress-backuplabels:app:wordpress-backupspec:schedule:"0 3 * * *"# Daily at 3 AMjobTemplate:spec:template:metadata:labels:app:wordpress-backupspec:containers:-name:wordpress-backupimage:alpine:latestcommand:-/bin/sh--c-|
set -e
apk add --no-cache tar gzip
BACKUP_FILE="/backup/wordpress-files-$(date+%Y%m%d-%H%M%S).tar.gz"echo"Starting WordPress files backup to $BACKUP_FILE"tar-czf$BACKUP_FILE-C/var/www/html\--exclude='wp-content/cache/*'\--exclude='wp-content/tmp/*'\.echo"WordPress files backup completed"# Keep only last 7 days of backupsfind/backup-name"wordpress-files-*.tar.gz"-mtime+7-deleteecho"Old file backups cleaned up"ls-la/backup/volumeMounts:-name:wordpress-datamountPath:/var/www/htmlreadOnly:true-name:backup-storagemountPath:/backupresources:requests:memory:"128Mi"cpu:"100m"limits:memory:"256Mi"cpu:"200m"volumes:-name:wordpress-datapersistentVolumeClaim:claimName:wordpress-pvc-name:backup-storagepersistentVolumeClaim:claimName:backup-pvcrestartPolicy:OnFailure
# Check pod status and events
kubectl get pods -l app=wordpress
kubectl describe pod <wordpress-pod-name>
# Common causes:# - Database connection issues# - PVC mounting problems# - Resource constraints# Check database connectivity
kubectl exec -it <wordpress-pod> -- wp db check --allow-root
2. Database Connection Problems
# Test MySQL connectivity
kubectl exec -it mysql-0 -- mysql -u root -p -e "SHOW DATABASES;"# Check MySQL service
kubectl get svc mysql
kubectl describe svc mysql
# Verify DNS resolution
kubectl exec -it <wordpress-pod> -- nslookup mysql
3. Storage Issues
# Check PVC status
kubectl get pvc
kubectl describe pvc wordpress-pvc
kubectl describe pvc mysql-data-mysql-0

# Check storage class
kubectl get storageclass
kubectl describe storageclass standard
4. Ingress Not Working
# Check Ingress status
kubectl get ingress
kubectl describe ingress wordpress-ingress

# Verify Ingress controller
kubectl get pods -n ingress-nginx
kubectl logs -n ingress-nginx -l app.kubernetes.io/name=ingress-nginx

# Check SSL certificate
kubectl get certificate
kubectl describe certificate wordpress-tls
5. Performance Issues
# Monitor resource usage
kubectl top pods -l app=wordpress
kubectl top pods -l app=mysql

# Check HPA status
kubectl get hpa
kubectl describe hpa wordpress-hpa

# View logs for errors
kubectl logs -l app=wordpress --tail=100
kubectl logs mysql-0 --tail=100
Production Considerations
Security Hardening
Network Policies: Implement network segmentation
Pod Security Standards: Use security contexts and policies
Secret Management: Use external secret management (e.g., Vault)
Regular Updates: Keep WordPress and plugins updated
Image Optimization: Use optimized WordPress images
Resource Limits: Fine-tune resource allocation
Operational Excellence
Monitoring: Implement comprehensive monitoring with Prometheus/Grafana
Logging: Centralize logs with ELK stack or similar
Alerting: Set up proactive alerting for issues
Disaster Recovery: Test backup and restore procedures
Documentation: Maintain operational runbooks
Example Production Enhancements
# Production-ready WordPress with Redis cachingapiVersion:apps/v1kind:Deploymentmetadata:name:wordpress-prodspec:replicas:5template:spec:containers:-name:wordpressimage:wordpress:6.3-php8.1-apacheenv:-name:WORDPRESS_CONFIG_EXTRAvalue:|
define('WP_CACHE', true);
define('WP_REDIS_HOST', 'redis');
define('WP_REDIS_PORT', 6379);
# Additional security and performance configurations
Conclusion
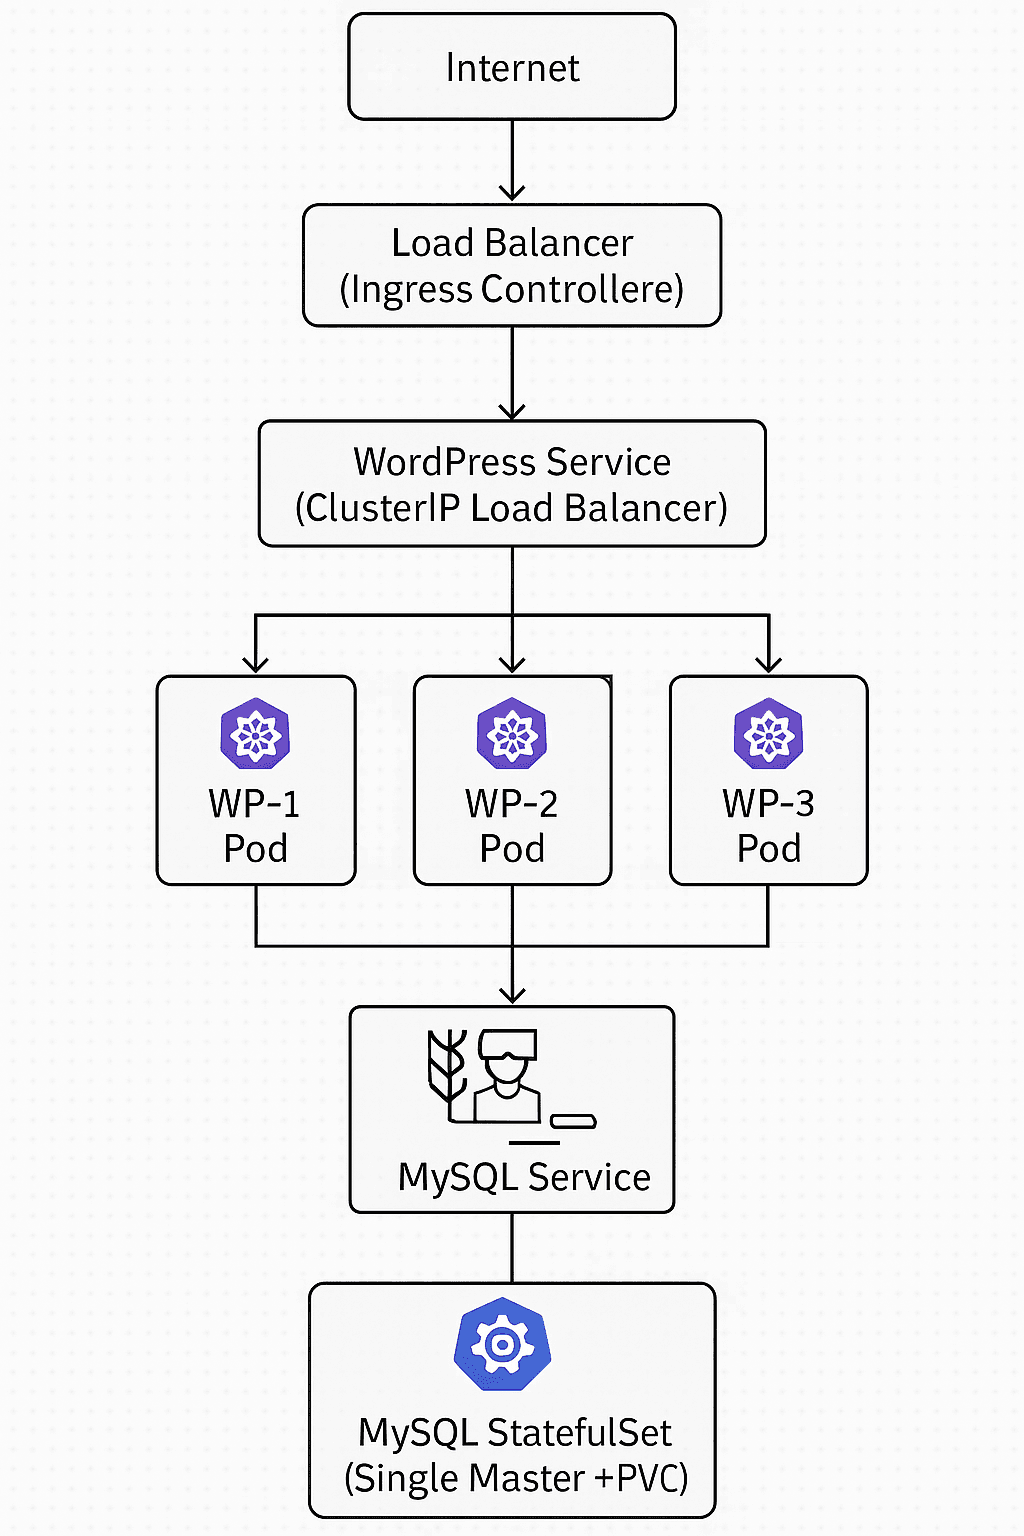
You've successfully deployed a high-availability WordPress platform on Kubernetes with:
✅ Scalable Architecture: Multiple WordPress replicas with load balancing
✅ Data Persistence: StatefulSet MySQL with persistent storage
✅ Auto-scaling: HPA for handling traffic spikes
✅ SSL/TLS: Automated certificate management
✅ Monitoring: Health checks and alerting
✅ Backup Strategy: Automated database and file backups
✅ Production Ready: Security, performance, and operational best practices
This setup can handle thousands of concurrent users and automatically scale based on demand. For production environments, consider implementing additional features like:
Redis caching for improved performance
CDN integration for global content delivery
Advanced monitoring with Prometheus and Grafana
GitOps deployment with ArgoCD or Flux
Multi-region deployment for global availability
Your WordPress platform is now ready to serve high-traffic websites with enterprise-grade reliability and scalability.